Samba AD Smart Card Login
Allowing Smart Card Login to a Samba4 Domain
Introduction
What This HOWTO Covers
This HOWTO walks through one way to get smart card login functionality working on Windows 7/8 clients that are joined to an Active Directory domain hosted by a Samba 4 AD domain controller.
What This HOWTO Doesn't Cover
Some of the many related topics this HOWTO doesn't cover:
- In this HOWTO, the private keys are generated in software, stored on disk and then loaded onto the smart card. Some might prefer to generate the keys on the smart card itself, so that the key material never leaves the card. How to do that is well beyond the scope of this HOWTO.
- I used the smart cards and smart card reader that I used -- and no others. How to select among the many Windows-compatible smart card(s) and reader(s) available is a topic outside the scope of this HOWTO.
- This HOWTO will not cover obtaining and installing Windows drivers for your smart card reader or your smart card. There's just too many of them. That being said, if the information isn't easily obtainable from the vendor, then I would advise you to consider if that vendor is someone from whom you should be buying items that you have to place your full trust in.
- This HOWTO will touch on, but not cover how to transfer certificates to your smart card. I do mention one tool that might work for a certain type of card, but even a walkthrough for that tool would be specific to the card I use.
Domain Information
Server (DC1)
- Operating System: Ubuntu Server 22.04 LTS
- Samba version: 4.15.5
- Server Hostname: dc1
- DNS Domain Name: greatlakes.example.com
- NT4 Domain Name: GREATLAKES
- IP Address: 192.168.60.5 (static)
- Server Role: DC
- DNS Backend: Internal
Client (Buffalo)
- Operating System: Windows 11 Pro
- IP Address configured via DHCP, with a static DNS entry.
Smartcard Hardware
Although this HOWTO does not cover the ins-and-outs of working with smartcards -- as I said, there are a lot of different varieties out there, each fitting different types of users and needs -- here's the card and reader I used for those interested. This equipment met my needs. YMMV.
Smart Card Reader/Writer
CAC Smart Card Reader
With Windows 11, the Smart Card Reader used is Zoweetek USB PIV Smart Card Reader. Any other PIV Smart Card reader that is compatible with windows should work.
Gemalto PCExpress
This is an ExpressCard/54 form-factor smart card reader. Apparently, Gemalto now sells this reader under the name "IDBridge CT510." Windows 7 and 8 drivers are available on Gemalto's website, and through the Microsoft Update Catalog website.
Smart Card
PIVKey Smart Card
With Windows 11, the PIV Smart Card used is PIVKey C910 PKI Smart Card. Any other PIV Smart Card should work.
Instruction, Windows tool and driver are available at PIVKey website
Gemalto .NET v2+ Smartcard
This card has been replaced by the "IDPrime .NET" family of cards. The one I used appears to be closest to the "ID Prime .NET 510" in functionality.
Windows 7 and 8 drivers can be downloaded from Gemalto's website. For Windows you will, at a minimum, need to have the card minidriver installed. The minidriver provides access to the smartcard for Windows, and is all you'll need to have installed in order to use this particular card for windows client logins once the card has the necessary certificates installed on it.
Gemalto also provides a PKCS#11 library for this card that allows applications to communicate with it via the standard PKCS#11 interface. Examples of such applications include Mozilla Firefox and Truecrypt. Using the PKCS#11 library, you can add and delete certificates from the smartcard within Firefox, and you can also set the smartcard's PIN. However, as far as I know, you can't use Firefox to change the card's admin/unblock key, which, on the Gemalto cards at least, is set to a default of all zeros. If you want to use these cards outside a casual setting, make sure you change the admin/unblock key. Gemalto distributes the PKCS#11 libraries as pre-compiled libraries, so they are OS-family specific. Currently, there's one for Windows and one for MacOS X 10.7-10.8 available on the relevant Gemalto download page. The Gemalto website states elsewhere that there is a Linux version of the library available by special request.
Yubikey
Yubico makes PIV compatible smart cards in their Yubikey 5 Series. These cards will work with PKCS#12 and support importing of .p12 certificates directly via the Yubikey Manager application that they distribute. This guide has been tested with a Yubikey 5 nano on a Windows 10 workstation. Ensure the following prerequisites are met:
- The imported certificate must be in
.p12, and a PUK pin defined via Yubikey manager - The Yubikey Minidriver must be installed. Optional: Yubico makes a
.msiversion of their driver which can be distributed via group policy
Basic Setup of Test Environment
I generally followed the Main Samba HOWTO, up until the point where the Windows client sucessfully joined the domain. I deviated in a few ways, listed here.
Client OS
I used Windows 7 (and Windows 11) as my client instead of Windows XP.
Windows XP Warning
The directions in this HOWTO currently do not result in successful smart card logins on Windows XP clients. The Samba log will show a sucessful Kerberos authentication, but the logon will fail on the Windows XP client with an error message in the event log about an "Invalid algorithm specified."
I suspect the problem is that I (sanely) used SHA256 as my signing hash. Windows XP did not support the SHA2 suite of hashes at all until Service Pack 3, and even then, there are still issues. One possible fix (that I have not tried) would be to replace "sha256" with "sha1" in the OpenSSL configuration file provided, and in the command used to generate the Root CA certificate, and then see if the resulting set-up successfully works on Windows XP. But even if it does, is it really worth it, given the reasons why you'd use a smart card for login?
Package Installation
In addition to the packages listed in the Samba HOWTO, I also installed the following packages on the Ubuntu server that was running Samba:
- libaio-dev
- lighttpd (for CRL distribution point)
Configuration
Samba 4.0.1 was configured as follows:
./configure --enable-debug --enable-gnutls --with-dnsupdate --with-acl-support -j 3
Samba 4.15.5 was configured as follows:
apt install -y acl attr samba samba-dsdb-modules samba-vfs-modules smbclient winbind libpam-winbind libnss-winbind libpam-krb5 krb5-config krb5-user dnsutils
systemctl disable --now smbd nmbd winbind
systemctl unmask samba-ad-dc
systemctl enable samba-ad-dc
samba-tool domain provision --interactive
 ...
systemctl start samba-ad-dc
Provision
The Active Directory domain was provisioned as follows:
samba-tool domain provision --domain=greatlakes.example.com --host-name=dc1 --host-ip=192.168.60.5 \
    --adminpass=ma5terCh1ef --dns-backend=SAMBA_INTERNAL --server-role=dc --interactive

REALM: GREATLAKES.EXAMPLE.COM
User Configuration and Directory Organization
For this HOWTO, I have created two users: Tina Admin, with the username tina; and Jerry User, with the user name jerry. The single client Windows workstation is named Buffalo. The directory is organized as follows:
greatlakes.example.com (Domain)
    People (OU)
        ITAdmins (OU)
            ITAdmins (Group) [Members: Tina Admin]
            Tina Admin (User)
        FieldReps (OU)
            FieldReps (Group) [Members: Jerry User]
            Jerry User (User)
        People (Group) [Members: ITAdmins (Group), FieldReps (Group)]
    Systems (OU)
        Workstations (OU)
            Workstations (Group) [Members: Buffalo]
            Buffalo (Computer)
        Systems (Group) [Members: Workstations (Group)]
    Domain Controllers (Built-in OU)
        Niagra (Computer/Domain Controller)
    Users (Built-In Folder)
        Administrator (Built-In User)
    ...
    Other Built-In Domain Groups/Containers/Users Omitted
Create a Certificate Authority and Create Certificates, Related Cryptographic Items
Prerequisites
- OpenSSL: You will need to have working OpenSSL. I used OpenSSL 3.0.2 on Ubuntu Server which is also the Samba Active Directory Domain Controller. I believe other versions will work as well, but I have not tested this.
- Smartcard, Smartcard Reader and Windows drivers. You'll also need to have installed the drivers for both the card reader and the card on any Windows client where you will login with a smart card.
- CRL Distribution Point (CDP): Microsoft requires that smart card certificates pass a revocation check when a login is attempted. Therefore, you will need to set up a location that each workstation can access (webserver, ftpserver, ldap, etc.) where Certificate Revocation Lists (CRLs) for the CA can be obtained.
For the purposes of this HOWTO, the CDP location will be http://dc1.greatlakes.example.com/greatlakes.crl, and will be hosted on a webserver on the domain controller. In general, one should not host other externally accessible services on the directory server, but this shouldn't be an issue for the purposes of this limited setup. As mitigation, the CDP server name will be an alias set up as a DNS CNAME record, so that the CDP server can be moved to another server later. As an alternative, I believe that one could set up an LDAP CDP within the directory, which the MS support document shows is acceptable for the purpose of revocation checking during logon. I am not sure how to set this up, however.
Considerations
When you create the CA, its adviced to setup CA_Root - > CA_Intermediate -> Certificates.
Suggested expire times:
- Set your CA_Root its expiration to 20 years.
- Set your CA_Intermediate its expiration to 10 years.
- Set your Certificates expiration to 1 or 2 years.
Suggestions/optional names to set for a AD-DC certificate:
- minimal : server1.internal.domain.tld internal.domain.tld
- optional : ntp1.internal.domain.tld dns1.internal.domain.tld ldap1.internal.domain.tld
Recommanded DNS settings for an AD-DC:
- minimal : A + PTR record for the "real" hostname, especially when you use CNAMES.
Create the Base CA Structure
A base OpenSSL configuration file is show below. You will need to customize it for your location. Take a moment skip ahead to the Get Domain Controller GUID section and have the hex info handy ahead of time.
On Ubuntu systems, an OpenSSL.cnf file ships with the OS. However to save yourself some headache, copy the template below into a new OpenSSL.cnf file in your working directory:
touch openssl.cnf
nano openssl.cnf
Edit the below template, omitting spaces in the domain controller GUID hex entry
#
# Based on the OpenSSL example configuration file.
# This is mostly being used for generation of certificate requests.
#
############# Customization ################
set_countryName_default = US
set_stateOrProvinceName_default = New York
set_localityName_default = Buffalo
set_organizationName_default = Niagra Falls Surfing, Ltd.
set_organizationalUnitName_default = Information Technology
set_crp_default = http://dc1.greatlakes.example.com/greatlakes.crl
set_dns = dc1.greatlakes.example.com
#See Domain Controller's GUID section in this HOWTO to obtain the GUID.
set_dc_guid = XXXXXXXXXXXXXXXXXXXXXXXXXXXXXXXX
###### No need to edit below this line ######

# This definition stops the following lines choking if HOME isn't
# defined.
HOME            = .
#RANDFILE        = $ENV::HOME/.rnd

CRLDISTPT       = $set_crp_default

# Extra OBJECT IDENTIFIER info:
oid_section     = new_oids

# To use this configuration file with the "-extfile" option of the
# "openssl x509" utility, name here the section containing the
# X.509v3 extensions to use:
# extensions        =
# (Alternatively, use a configuration file that has only
# X.509v3 extensions in its main [= default] section.)

[ new_oids ]
# Ordinarily, certificates must have this oid as an enhanced key usage in order for Windows to allow them to be used as a login credential

# Identifies the AD GUID
msADGUID=1.3.6.1.4.1.311.25.1

####################################################################
[ ca ]
default_ca  = CA_default        # The default ca section

####################################################################
[ CA_default ]

dir         = .                 # Where everything is kept
certs       = $dir/certs        # Where the issued certs are kept
crl_dir     = $dir/crl          # Where the issued crl are kept
database    = $dir/index.txt    # database index file.
unique_subject  = yes           # Set to 'no' to allow creation of
                                # several certificates with same subject.
new_certs_dir   = $dir/newcerts     # default place for new certs.

certificate = $dir/cacert.pem   # The CA certificate
serial      = $dir/serial       # The current serial number
crlnumber   = $dir/crlnumber    # the current crl number
                                # must be commented out to leave a V1 CRL

crl         = $dir/ca-crl.pem           # The current CRL
private_key = $dir/private/cakey.pem    # The private key
RANDFILE    = $dir/private/.rand        # private random number file

#x509_extensions    =   # The extensions to add to the cert

# Comment out the following two lines for the "traditional"
# (and highly broken) format.
name_opt    = ca_default        # Subject Name options
cert_opt    = ca_default        # Certificate field options

# Extension copying option: use with caution.
copy_extensions = copy

# Extensions to add to a CRL. Note: Netscape communicator chokes on V2 CRLs
# so this is commented out by default to leave a V1 CRL.
# crlnumber must also be commented out to leave a V1 CRL.
crl_extensions  = crl_ext

default_days    = 730           # how long to certify for
default_crl_days= 30            # how long before next CRL
default_md  = sha256            # use public key default MD
preserve    = no                # keep passed DN ordering

# A few difference way of specifying how similar the request should look
# For type CA, the listed attributes must be the same, and the optional
# and supplied fields are just that :-)
policy      = policy_match

# For the CA policy
[ policy_match ]
countryName     = match
stateOrProvinceName = match
organizationName    = match
organizationalUnitName  = optional
commonName      = supplied
emailAddress        = optional

# For the 'anything' policy
# At this point in time, you must list all acceptable 'object'
# types.
[ policy_anything ]
countryName     = match
stateOrProvinceName = match
localityName        = match
organizationName    = match
organizationalUnitName  = match
commonName      = supplied
emailAddress        = supplied

####################################################################
[ req ]
default_bits        = 2048
default_keyfile     = privkey.pem
distinguished_name  = req_distinguished_name
attributes      = req_attributes
x509_extensions = v3_ca # The extensions to add to the self signed cert

# Passwords for private keys if not present they will be prompted for
# input_password = secret
# output_password = secret

# This sets a mask for permitted string types. There are several options.
# default: PrintableString, T61String, BMPString.
# pkix   : PrintableString, BMPString (PKIX recommendation before 2004)
# utf8only: only UTF8Strings (PKIX recommendation after 2004).
# nombstr : PrintableString, T61String (no BMPStrings or UTF8Strings).
# MASK:XXXX a literal mask value.
# WARNING: ancient versions of Netscape crash on BMPStrings or UTF8Strings.
string_mask = utf8only

# req_extensions = v3_req # The extensions to add to a certificate request

[ req_distinguished_name ]
countryName         = Country Name (2 letter code)
countryName_default     = $set_countryName_default
countryName_min         = 2
countryName_max         = 2

stateOrProvinceName     = State or Province Name (full name)
stateOrProvinceName_default = $set_stateOrProvinceName_default

localityName            = Locality Name (eg, city)
localityName_default    = $set_localityName_default

organizationName        = Organization Name (eg, company)
organizationName_default    = $set_organizationName_default

organizationalUnitName      = Organizational Unit Name (eg, section)
organizationalUnitName_default = $set_organizationalUnitName_default

commonName          = Common Name (eg, YOUR name)
commonName_max          = 64

emailAddress            = Email Address
emailAddress_max        = 64

# SET-ex3           = SET extension number 3

[ req_attributes ]
challengePassword       = A challenge password
challengePassword_min       = 4
challengePassword_max       = 20

unstructuredName        = An optional company name

[ v3_req ]

# Extensions to add to a certificate request

basicConstraints = CA:FALSE
keyUsage = nonRepudiation, digitalSignature, keyEncipherment

[ v3_ca ]
# Extensions for a typical CA
# PKIX recommendation.
subjectKeyIdentifier=hash
authorityKeyIdentifier=keyid:always,issuer

# This is what PKIX recommends but some broken software chokes on critical
# extensions.
#basicConstraints = critical,CA:true
# So we do this instead.
basicConstraints = CA:true

# Key usage: this is typical for a CA certificate.
keyUsage = cRLSign, keyCertSign

crlDistributionPoints=URI:$CRLDISTPT

# Some might want this also
nsCertType = sslCA, emailCA

# Include email address in subject alt name: another PKIX recommendation
#subjectAltName=email:copy
# Copy issuer details
issuerAltName=issuer:copy

[ crl_ext ]
# CRL extensions.
# Only issuerAltName and authorityKeyIdentifier make any sense in a CRL.

issuerAltName=issuer:copy
authorityKeyIdentifier=keyid:always


########################################## Domain Controller Certificate #####################################
[ usr_cert_mskdc ]

# These extensions are added when 'ca' signs a request for a domain controller certificate.

# This goes against PKIX guidelines but some CAs do it and some software
# requires this to avoid interpreting an end user certificate as a CA.

basicConstraints=CA:FALSE
crlDistributionPoints=URI:$CRLDISTPT

# Here are some examples of the usage of nsCertType. If it is omitted
# the certificate can be used for anything *except* object signing.

# This is OK for an SSL server.
nsCertType          = server

# This is typical in keyUsage for a client certificate.
keyUsage = nonRepudiation, digitalSignature, keyEncipherment

# This will be displayed in Netscape's comment listbox.
nsComment           = "Domain Controller Certificate"

# PKIX recommendations harmless if included in all certificates.
subjectKeyIdentifier=hash
authorityKeyIdentifier=keyid,issuer

# This stuff is for subjectAltName and issuerAltname.

subjectAltName=@dc_subjalt

# Copy subject details
issuerAltName=issuer:copy

nsCaRevocationUrl       = $CRLDISTPT
#nsBaseUrl
#nsRevocationUrl
#nsRenewalUrl
#nsCaPolicyUrl
#nsSslServerName

#Extended Key requirements for our domain controller certs
# serverAuth - says cert can be used to identify an ssl/tls server
# pkInitKDC - says cert can be used to identify a Kerberos Domain Controller.
extendedKeyUsage = clientAuth,serverAuth,pkInitKDC

[dc_subjalt]
DNS=$set_dns
otherName=msADGUID;FORMAT:HEX,OCTETSTRING:$set_dc_guid


########################################### User Certificates ################################################
[ usr_cert_scarduser ]

# These extensions are added when 'ca' signs a request for a certificate that will be used to login from a smart card

# This goes against PKIX guidelines but some CAs do it and some software
# requires this to avoid interpreting an end user certificate as a CA.

basicConstraints=CA:FALSE
crlDistributionPoints=URI:$CRLDISTPT

# For normal client use this is typical
nsCertType = client, email

# This is typical in keyUsage for a client certificate.
keyUsage = nonRepudiation, digitalSignature, keyEncipherment

# This will be displayed in Netscape's comment listbox.
nsComment           = "Smart Card Login Certificate"

# PKIX recommendations harmless if included in all certificates.
subjectKeyIdentifier=hash
authorityKeyIdentifier=keyid,issuer

# This stuff is for subjectAltName and issuerAltname.

#subjectAltName=email:copy,otherName:msUPN;UTF8:[UPN of user]

# Copy subject details
issuerAltName=issuer:copy

nsCaRevocationUrl       = $CRLDISTPT
#nsBaseUrl
#nsRevocationUrl
#nsRenewalUrl
#nsCaPolicyUrl
#nsSslServerName

#Extended Key requirements for client certs
extendedKeyUsage = clientAuth,msSmartcardLogin
Follow these steps to set up the basic CA structure:
- Create a directory for the CA, which will be refered to as the CA Base Directory.
- Copy the base configuration file to that directory, edit it where indicated, and name it
openssl.cnf - Create the following directories in the CA Base Directory: certs, crl, private, newcerts
mkdir certs crl private newcerts
- Create a blank text file named index.txt in the CA Base Directory.
touch index.txt
- Create the 'serial' file:
echo 00 > serial
- Create the 'crlnumber' file:
echo 00 > crlnumber
Create the CA Root Certificate
Make the Root Certificate
From the CA Base Directory, execute the following command:
openssl req -new -x509 -days 3650 -sha256 -extensions v3_ca -addext 'subjectAltName = email:copy' -keyout private/cakey.pem -out cacert.pem -config openssl.cnf
You will be prompted for a password for the CA private key. You will need it to issue any certificates signed by the CA. You will then be asked to provide other information that will be incorporated in to the certificate.
Loading 'screen' into random state - done
Generating a 2048 bit RSA private key
.....................................................................................................+++
..........+++
writing new private key to 'private/cakey.pem'
Enter PEM pass phrase:
Verifying - Enter PEM pass phrase:
-----
You are about to be asked to enter information that will be incorporated
into your certificate request.
What you are about to enter is what is called a Distinguished Name or a DN.
There are quite a few fields but you can leave some blank
For some fields there will be a default value,
If you enter '.', the field will be left blank.
-----
Country Name (2 letter code) [US]:
State or Province Name (full name) [New York]:
Locality Name (eg, city) [Buffalo]:
Organization Name (eg, company) [Niagra Falls Surfing, Ltd.]:
Organizational Unit Name (eg, section) []:Information Technology
Common Name (eg, YOUR name) []:Greatlakes.example.com Certificate Authority
Email Address []:ca@greatlakes.example.com
If all goes well, a public CA root certificate will be created in the CA Base Directory with the name cacert.pem. The private key will be created in the directory "private", with the name cakey.pem. Remember that anyone with the CA key (and the password for it) can issue certificates from the CA -- and create valid login credentials for your domain.
Verify the Information in the Root CA Certificate
Using the following command, output the CA root certificate to text format, and examine the outputted file.
openssl x509 -in cacert.pem -text -out cacert.txt
In particular, ensure that the CRL distribution point is correct. Technically, the value listed in the CA cert might be ignored, but it will matter in issued certificates, and it's much easier to fix errors now -- just delete the root certificate and private key, change the relevant values in the configuration file, and create a new root certificate and key.
Create a DER Format Version of the CA Root Certificate
Windows doesn't understand PEM-formatted certificates, so we'll create a DER-formatted copy of the CA root certificate, and give it a Windows-friendly .cer extension.
openssl x509 -in cacert.pem -inform PEM -out cacert.cer -outform DER
Obtain Each User's User Principal Name (UPN) and the Domain Controller's GUID
Before you can issue certificates, you will need to obtain the "User Principal Name" of each user that will be logging in via smart card, as well as the GUID of your domain controller.
Normally, a User Principal Name is user@domain, i.e. tina@greatlakes.example.com, jerry@greatlakes.example.com. After obtaining the GUID of the Domain Controller, put it in the openssl.cnf, i.e. set_dc_guid = 32bfa4aa2a1b43478ae3669f6109f08a
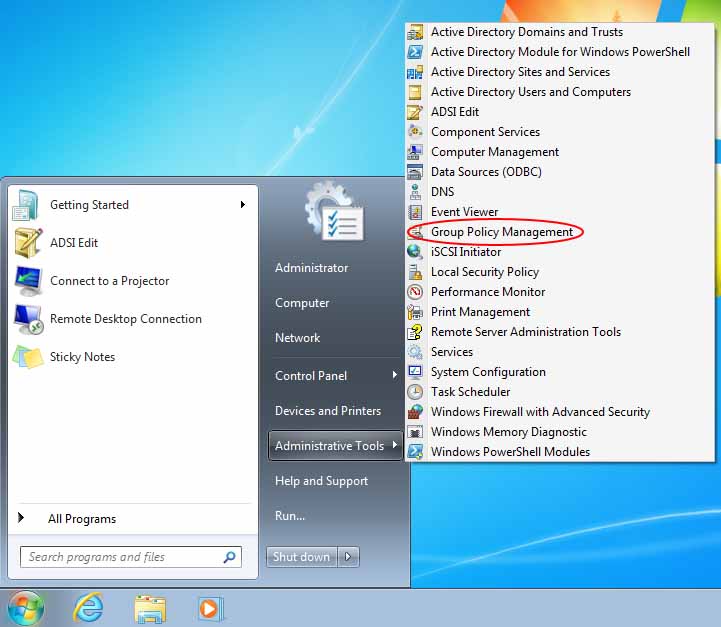
I assume you have installed the Remote Server Administration Tools on a domain-joined Windows client machine - you'll need the included Active Directory Tools. If not, please go ahead and do so now. Then launch the Active Directory Services Interfaces Editor (listed as ADSI Edit in the Administrative Tools menu), while logged in as a domain Administrator.

Right-click on the 'ADSI Edit' in the upper left hand corner of the screen and select "Connect To..."

The Connection Settings dialog box should appear. You should be able to just click OK.

Once a connection has been established, you can browse down the tree.
Get the Domain Controller's GUID
When you expand the "Default naming context" and its child "DC=greatlakes,DC=example,DC=com", you'll see a list of child nodes of items in Active Directory.

Select the child node called "OU=Domain Controllers". There should be one child: "CN=NIAGRA". Right click on that child and select "Properties" from the pop-up menu.

The Attribute Editor appears. Scroll down until you find the entry for the attribute "objectGUID", then click the "View" button.

Make sure that the "Value format" is set to Hexadecimal, then copy the value listed and save it somewhere.

Click OK to close the Attribute Editor dialog, then close the Attribute Editor window for the Niagra domain controller object.
Get the Domain Controller's GUID with script
Following script executed on Samba AD-DC will provide DC GUID in hex notation directly. If necessary, install ldb-tools with
apt-get install ldb-tools
Then create and execute the following script
#/usr/bin/env bash

# You no longer need Windows for aquiring DCs GUID

convertToHex() {
  # Inspired by https://docs.microsoft.com/en-us/troubleshoot/windows-server/admin-development/convert-string-guid-to-hexadecimal-string
  RAW="$1"
  GUID=$(echo "$RAW" | sed 's/\-//g')

  HEX="${GUID:6:2}"
  HEX="${HEX}${GUID:4:2}"
  HEX="${HEX}${GUID:2:2}"
  HEX="${HEX}${GUID:0:2}"
  HEX="${HEX}${GUID:10:2}"
  HEX="${HEX}${GUID:8:2}"
  HEX="${HEX}${GUID:14:2}"
  HEX="${HEX}${GUID:12:2}"
  len=${#HEX}
  HEX="${HEX}${GUID:16:${len}}"

  echo "$RAW -> $HEX"
}


# apt install ldb-tools
realm=$(grep -i realm /etc/samba/smb.conf | awk '{print $3}' | tr '[:upper:]' '[:lower:]')
dc=$(echo $realm | awk -F '.' '{for(i = 1; i <= NF; i++) {printf ",DC=" $i}}')
base="OU=Domain Controllers${dc}"
cn=$(hostname -s)

GUID=$(ldbsearch  -H /var/lib/samba/private/sam.ldb --basedn="$base" "CN=${cn}" objectGUID \
  | grep '^objectGUID:' \
  | awk '{print $2}' \
)
convertToHex "$GUID"
Get Each User's UPN
A UserPrincipalName is a user's identifying name within the underlying Kerberos authentication. You will need a user's UPN so you can make a part of their login certificate, which will allow the Kerberos authentication logic on the Samba domain controller to map the certificate to an Active Directory user account.
A UPN is an attribute of a user object. In this test setup, all users are located in the "People" Organizational Unit, so expand that node in ADSI Edit.

The user Tina Admin is in the "ITAdmins" Organizational Unit, so expand that node, then right-click on the "CN=Tina Admin" node, and select "Properties" from the popup menu.

In the Attribute Editor dialog, scroll down to the attribute "userPrincipalName" and copy down the value: "tina@greatlakes.example.com" (While the UPN is usually the username@domain.name, it isn't always).

Repeat the procedure to obtain the UPN of Jerry User, who is located in the "FieldReps" Organizational Unit.
Create a Certificate for the Domain Controller
Use the following commands to create a request for, and then issue a signed certificate for the domain controller.
openssl req -new -addext 'subjectAltName = email:copy' -newkey rsa:2048 -keyout private/dc-key.pem -out dc-req.pem -config openssl.cnf
You will then be asked for some information about the certified entity. When it asks for the Common Name (CN) enter the DNS name of the server. You can leave the email address blank.
openssl req -new -addext 'subjectAltName = email:copy' -newkey rsa:2048 -keyout private/dc-key.pem -out dc-req.pem -config openssl.cnf
Loading 'screen' into random state - done
Generating a 2048 bit RSA private key
........+++
...........................+++
writing new private key to 'private/dc-key.pem'
Enter PEM pass phrase:
Verifying - Enter PEM pass phrase:
-----
You are about to be asked to enter information that will be incorporated
into your certificate request.
What you are about to enter is what is called a Distinguished Name or a DN.
There are quite a few fields but you can leave some blank
For some fields there will be a default value,
If you enter '.', the field will be left blank.
-----
Country Name (2 letter code) [US]:
State or Province Name (full name) [New York]:
Locality Name (eg, city) [Buffalo]:
Organization Name (eg, company) [Niagra Falls Surfing, Ltd.]:
Organizational Unit Name (eg, section) [Information Technology]:Domain Controllers
Common Name (eg, YOUR name) []:dc1.greatlakes.example.com
Email Address []:

Please enter the following 'extra' attributes
to be sent with your certificate request
A challenge password []:
An optional company name []:
Now have the CA issue the certificate:
openssl ca -config openssl.cnf -extensions usr_cert_mskdc -in dc-req.pem -out dc-cert.pem
Enter the password for the CA root key, verify the information for the requested certificate. If it's correct, type 'y' to issue the certificate, and 'y' to commit it to the CA's internal database.
openssl ca -config openssl.cnf -extensions usr_cert_mskdc -in dc-req.pem -out dc-cert.pem
Using configuration from openssl.cnf
Loading 'screen' into random state - done
Enter pass phrase for ./private/cakey.pem:
Check that the request matches the signature
Signature ok
Certificate Details:
        Serial Number: 0 (0x0)
        Validity
            Not Before: Jan 24 09:13:01 2013 GMT
            Not After : Jan 24 09:13:01 2015 GMT
        Subject:
            countryName               = US
            stateOrProvinceName       = New York
            organizationName          = Niagra Falls Surfing, Ltd.
            organizationalUnitName    = Domain Controllers
            commonName                = dc1.greatlakes.example.com
        X509v3 extensions:
            X509v3 Basic Constraints:
                CA:FALSE
            X509v3 CRL Distribution Points:

                Full Name:
                  URI:http://dc1.greatlakes.example.com/greatlakes.crl

            Netscape Cert Type:
                SSL Server
            X509v3 Key Usage:
                Digital Signature, Non Repudiation, Key Encipherment
            Netscape Comment:
                Domain Controller Certificate
            X509v3 Subject Key Identifier:
                2B:1A:72:8A:86:EE:3D:15:7A:E5:F0:B9:C5:0D:D4:40:E0:E2:3E:7F
            X509v3 Authority Key Identifier:
                keyid:33:9C:6B:7F:EB:A4:CB:D5:27:89:4F:07:72:3D:19:E5:4F:80:D1:14

            X509v3 Subject Alternative Name:
                DNS:dc1.greatlakes.example.com, othername:unsupported
            X509v3 Issuer Alternative Name:
                email:ca@greatlakes.example.com
            Netscape CA Revocation Url:
                http://dc1.greatlakes.example.com/greatlakes.crl
            X509v3 Extended Key Usage:
                TLS Web Client Authentication, TLS Web Server Authentication, msKDC
Certificate is to be certified until Jan 24 09:13:01 2015 GMT (730 days)
Sign the certificate? [y/n]:y
1 out of 1 certificate requests certified, commit? [y/n]y
Write out database with 1 new entries
Data Base Updated
Your domain controller certificate is dc-cert.pem, with a private key stored in the private directory as dc-key.pem.
If you convert your domain controller certificate to DER format and open it on a Windows machine,
openssl x509 -in dc-cert.pem -inform PEM -out dc-cert.cer -outform DER
you can verify that the subject alternative name contains an entry of type "DS Object Guid", and a value of '04 10 [Domain Controller GUID]'. According to Microsoft's documentation, the 04 is the tag byte for an octet string, while the 10 is the length of the string (16 bytes).

Generate Certificates for Each User
Execute the following command from the CA Base Directory to create a certificate request for Tina Admin. For other users, replace tina@greatlakes.example.com with appropriate userPricipalName from the above Get Each User's UPN section.
openssl req -new \
            -addext 'subjectAltName = otherName:msUPN;UTF8:tina@greatlakes.example.com,email:copy' \
            -newkey rsa:2048 \
            -keyout private/tinaadmin-key.pem \
            -out tinaadmin-req.pem \
            -config openssl.cnf
Then provide the requested information. The key piece of information is the Common Name.
openssl req -new -addext ‘subjectAltName = otherName:msUPN;UTF8:tina@greatlakes.example.com,email:copy’ -newkey rsa:2048 -keyout private/tinaadmin-key.pem -out tinaadmin-req.pem -config openssl.cnf
Loading 'screen' into random state - done
Generating a 2048 bit RSA private key
..................................+++
......................................+++
writing new private key to 'private/tinaadmin-key.pem'
Enter PEM pass phrase:
Verifying - Enter PEM pass phrase:
-----
You are about to be asked to enter information that will be incorporated
into your certificate request.
What you are about to enter is what is called a Distinguished Name or a DN.
There are quite a few fields but you can leave some blank
For some fields there will be a default value,
If you enter '.', the field will be left blank.
-----
Country Name (2 letter code) [US]:
State or Province Name (full name) [New York]:
Locality Name (eg, city) [Buffalo]:
Organization Name (eg, company) [Niagra Falls Surfing, Ltd.]:
Organizational Unit Name (eg, section) [Information Technology]:People
Common Name (eg, YOUR name) []:Tina Admin
Email Address []:tina@greatlakes.example.com

Please enter the following 'extra' attributes
to be sent with your certificate request
A challenge password []:
An optional company name []:
Then enter the following command to verify the certificate information, and have the CA sign the request and issue the certificate:
openssl ca -config openssl.cnf -extensions usr_cert_scarduser -in tinaadmin-req.pem -out tinaadmin-cert.pem
Using configuration from openssl.cnf
Loading 'screen' into random state - done
Enter pass phrase for ./private/cakey.pem:
Check that the request matches the signature
Signature ok
Certificate Details:
        Serial Number: 1 (0x1)
        Validity
            Not Before: Jan 24 11:49:02 2013 GMT
            Not After : Jan 24 11:49:02 2015 GMT
        Subject:
            countryName               = US
            stateOrProvinceName       = New York
            organizationName          = Niagra Falls Surfing, Ltd.
            organizationalUnitName    = People
            commonName                = Tina Admin
            emailAddress              = tina@greatlakes.example.com
        X509v3 extensions:
            X509v3 Basic Constraints:
                CA:FALSE
            X509v3 CRL Distribution Points:

                Full Name:
                  URI:http://crl.greatlakes.example.com/greatlakes.crl

            Netscape Cert Type:
                SSL Client, S/MIME
            X509v3 Key Usage:
                Digital Signature, Non Repudiation, Key Encipherment
            Netscape Comment:
                Smart Card Login Certificate
            X509v3 Subject Key Identifier:
                42:76:57:FC:7A:E9:27:3D:5F:BC:3E:3F:55:AB:7F:0B:7F:DF:D7:1F
            X509v3 Authority Key Identifier:
                keyid:F7:F5:3F:DE:5D:D7:FE:4F:3A:17:94:11:CA:DE:BF:45:A3:7E:6A:5A
            X509v3 Subject Alternative Name:
                email:tina@greatlakes.example.com, othername:unsupported
            X509v3 Issuer Alternative Name:
                email:ca@greatlakes.example.com
            Netscape CA Revocation Url:
                http://crl.greatlakes.example.com/greatlakes.crl
            X509v3 Extended Key Usage:
                TLS Web Client Authentication, scardLogin
Certificate is to be certified until Jan 24 11:49:02 2015 GMT (730 days)
Sign the certificate? [y/n]:y

1 out of 1 certificate requests certified, commit? [y/n]y
Write out database with 1 new entries
Data Base Updated
Convert the resulting CA certificate to DER format, and on Windows, you can open the DER-formatted certificate and verify that the UPN attribute is correct, and that the certificate has Smart Card Logon as an enhanced key usage:
openssl x509 -in tinaadmin-cert.pem -inform PEM -out tinaadmin-cert.cer -outform DER


Request and approve certificate for Jerry User as done for Tina Admin. There is no need to edit the openssl.cnf. Each user can have only one certificate. A certificate must be revoked first before a new one can be created.
Generate a CRL
In the CA Base Directory, create a initialize and create a CRL using the following commands, but be sure to change greatlakes to your domain:
echo 1000 > greatlakes.crl
openssl ca -config openssl.cnf -gencrl -out greatlakes.crl
Generate a Diffie-Hellman Parameters File for the Domain Controller
In the CA Base Directory, create a DH parameters file for the domain controller by executing the following command. The parameters size must match that of the domain controller certificate. Feel free to add some random files to the mix.
openssl dhparam -outform PEM -out dcdhparams.pem 2048
This will probably take a while, so go out and get some fresh air. (If you decided that you had to have a 4096-bit certificate for your domain controller, good luck!)
Set up the CRL Distribution Point

The .crlfile that the CRL Distribution Point hosts must be accessible for the first logon of a domain user with a Smart Card. If Windows cannot obtain this file, it will present a generic error that states: "This smart card could not be used. Additional details may be available in the system event log. Please report this error to your administrator"Create a CNAME record for the CRL Distribution Point Location (Optional)
While this isn't strictly necessary, it will make it possible to move the CDP location at a later date, without having to change the information in any of the certificates. Obviously, you can only do this if you didn't pick a name that is already being used for other services. On the Samba domain controller, enter the command (substituting your domain information):
$ sudo samba-tool dns add dc1 greatlakes.example.com crl CNAME dc1.greatlakes.example.com -UAdministrator
To verify that the record is working correctly, ping the new alias (e.g., crl.greatlakes.example.com) from both your Samba server and your Windows client.
Copy the CRL to the Distribution Location
In my sample domain, I installed the lighttpd web server on the domain controller. By default, its document root directory is /var/www. I've copied the CRL generated earlier to the document root directory, and given it the name
"greatlakes.crl"to match the name listed in each certificate as the CRL Distribution Point, i.e.http://dc1.greatlakes.example.com/greatlakes.crl.Verify that Windows Domain Clients Can Access the CRL Distribution Point
Verify that Windows machines in your domain can access the CRL at the correct location by entering the CRL distribution location listed in your certificates into Internet Explorer on a domain-joined Windows client. If successful, IE should ask whether to open or save the file, and if you click open, you should see a window containing information about the CRL.
Configure the Samba Domain Controller
Shut down Samba
$ sudo systemctl stop samba-ad-dc smbd
Delete Samba-Generated Certificates and CA Files
In the tls subdirectory, there will already exist a ca certificate named ca.pem, and a domain controller certificate/private key pair named cert.pem and key.pem, respectively. Delete all three files (after backing them up somewhere).
pushd /var/lib/samba/private/tls
mkdir backup
mv ca.pem cert.pem key.pem backup/
popd
Copy Necessary Files to the Samba Domain Controller
You'll need to have the following files on your DC. In this example, they will have the following names:
- The Domain Controller certificate and private key (dc-cert.pem, dc-key.pem)
- The Root CA certificate (but not the CA root key) (cacert.pem)
- The CRL (ca.crl)
- The Diffie-Hellman parameters file (dc-dhparams.pem)
Put each of these files, except the Domain Controller's private key, in the now-empty "tls" sub-directory of your Samba domain controller's provision. Then, create a directory named "secure" in the tls directory, and put the Domain Controller's private key in this newly-created "secure" directory. Make sure that both the "secure" folder and the Domain Controller's private key are only accessible to root (and the user that Samba is running as, if it is different).
cp -p dc-cert.pem cacert.pem greatlakes.crl dcdhparams.pem /var/lib/samba/private/tls/
mkdir /var/lib/samba/private/tls/secure
cp -p private/dc-key.pem /var/lib/samba/private/tls/secure
The resulting directory/file structure is as follows:
Samba Provision Directory (dc1: /var/lib/samba/private)
    tls
        dc-cert.pem
        cacert.pem
        greatlakes.crl
        dcdhparams.pem
        secure
            dc-key.pem
Decrypt the Domain Controller Private Key
Samba can't read encrypted private key files, so you'll need to decrypt the domain controller's private key file and store it somewhere. For simplicity, I stored it in the same directory as the encrypted key, and named it dc-privkey.pem. You'll need to run this command as a user than can access the private key.
pushd /var/lib/samba/private/tls/secure/
openssl rsa -in dc-key.pem -inform PEM -out dc-privkey.pem -outform PEM
popd
Again, make sure that only root (and the user account Samba is running as, if it is different) can access the private key file (whether encrypted or decrypted).
Modify Samba's Configuration File to Use Your PKI Infrastructure
Add the following lines to the global section of your smb.conf, i.e. /etc/samba/smb.conf (adjust for your provision location):
tls enabled = yes
tls certfile = /var/lib/samba/private/tls/dc-cert.pem
tls keyfile = /var/lib/samba/private/tls/secure/dc-privkey.pem
tls cafile = /var/lib/samba/private/tls/cacert.pem
tls crlfile = /var/lib/samba/private/tls/greatlakes.crl
tls dhparams file = /var/lib/samba/private/tls/dcdhparams.pem
Start Samba
And verify using the logs that there were no errors loading the certificate and associated files.
$ sudo systemctl start samba-ad-dc
$ sudo systemctl status samba-ad-dc
Shutdown Samba (Again)
systemctl stop samba-ad-dc
Onward!
Edit the Samba KDC Configuration File to Enable PKINIT Authentication
Open the Kerberos configuration file in your Samba provision,
/var/lib/samba/private/krb5.conf, and edit it to look like the following (adjusted for your domain, of course). The first four lines should be identical to the contents of the existing contents of the krb5.conf file. (You can find out more regarding these settings here.)[libdefaults] default_realm = GREATLAKES.EXAMPLE.COM dns_lookup_realm = false dns_lookup_kdc = true pkinit_anchors = FILE:/var/lib/samba/private/tls/cacert.pem [appdefaults] pkinit_anchors = FILE:/var/lib/samba/private/tls/cacert.pem [realms] GREATLAKES.EXAMPLE.COM = { pkinit_require_eku = true } [kdc] enable-pkinit = yes pkinit_identity = FILE:/var/lib/samba/private/tls/dc-cert.pem,/var/lib/samba/private/tls/secure/dc-privkey.pem pkinit_anchors = FILE:/var/lib/samba/private/tls/cacert.pem pkinit_principal_in_certificate = yes pkinit_win2k = no pkinit_win2k_require_binding = yesNote: the dash in "enable-pkinit" is not a typo.
Save the configuration file and close it.
Replace System Kerberos Configuration File with Symlink to Samba's Internal Kerberos Configuration File
Archive your existing system-wide Kerberos configuration file (typically
/etc/krb5.conf) file and then replace it with a symlink to Samba's internal Kerberos configuration file.$ sudo ln -s /var/lib/samba/private/krb5.conf /etc/krb5.conf
Start Samba
Start the Samba DC again and ensure that it starts up cleanly.
$ sudo systemctl start samba-ad-dc
$ sudo systemctl status samba-ad-dc
Configure Windows to Accept Your CA
Add the Root CA certificate to the Trusted Root CAs for the Domain
Logon to a domain-joined Windows client as a domain administrator, and copy a DER-format copy of the CA root certificate to the Desktop. Give it the file name cacert.cer, then, open the Group Policy Management tool.
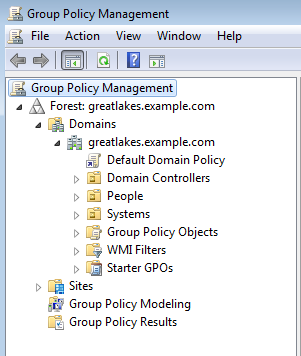
Expand the tree node labeled "Forest: greatlakes.example.com," then expand the child node labeled "Domains," and finally, expand the child node labeled "greatlakes.example.com."
Right click on the node labeled "Default Domain Policy," and select the top menu option, "Edit..."
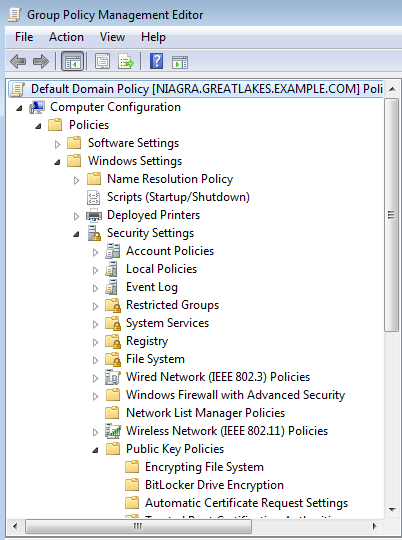
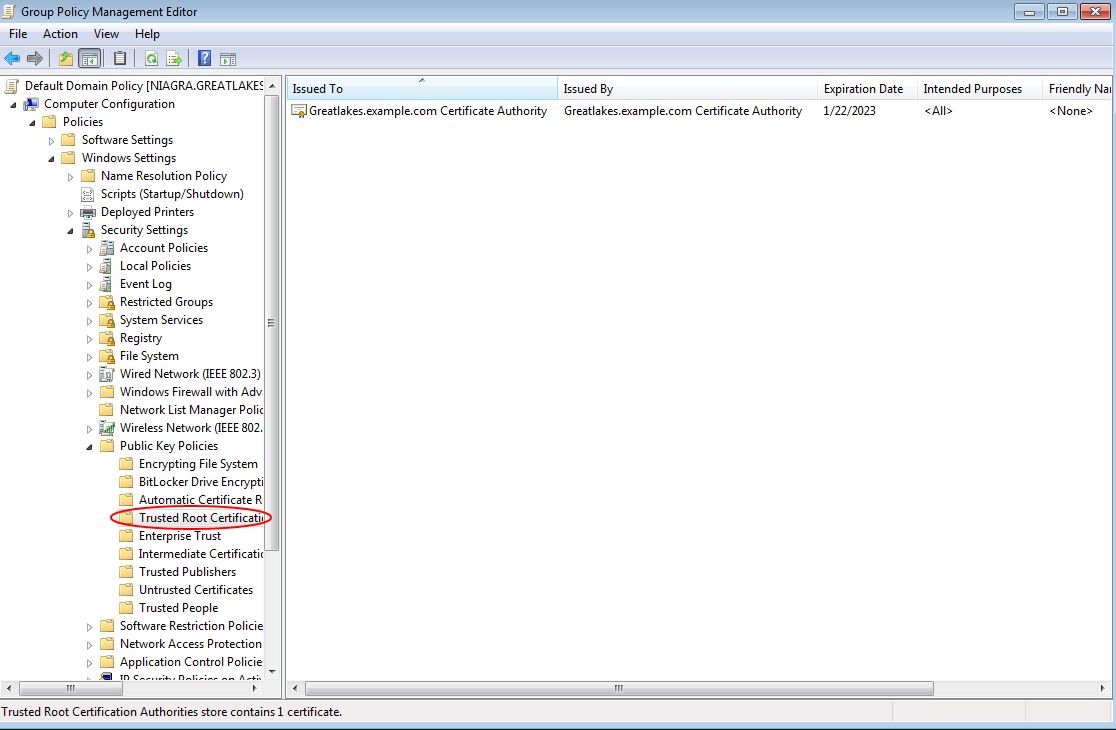
In the Group Policy Management Editor window that opens, expand the "Policies" node under "Computer Configuration", then expand the "Windows Settings" node, then "Security Settings", and then expand the node labeled "Public Key Policies."
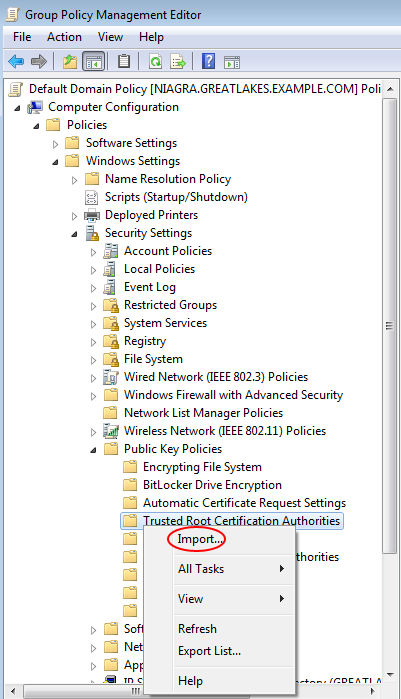
Right click on the child node labeled "Trusted Root Certification Authorities" and select "Import..." from the popup menu. The "Certificate Import Wizard" appears.
Click "Next," then enter the location of the root certificate file that you copied over earlier.

Click Next. The next page of the dialog box should present you with a non-choice - the certificate will be placed in the "Trusted Root Certification Authorities" certificate store -- which is exactly what you want.

Click Next. The summary page should appear.
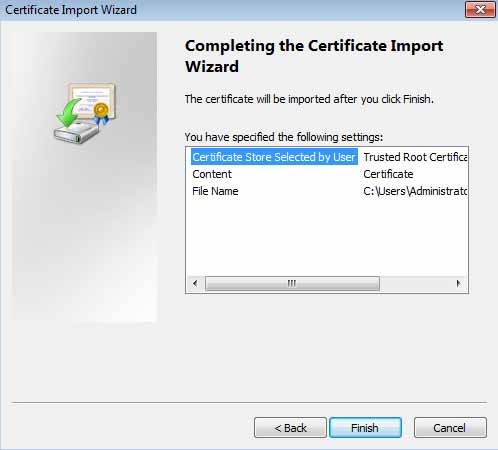
Click Finish, and if the certificate was successfully imported into the Default Domain Group Policy, you will see the message "The import was successful." Click OK. The root certificate should now appear under Trusted Root Certification Authorities in the Group Policy Management Editor.
Close the Group Policy Management Editor and the Group Policy Management window. Once domain clients update their group policy, they will trust your CA as a legitimate certificate authority.
Update Your Windows Client's Group Policy
One way to update group policy is to reboot. The other way is to open a command prompt with administrator privileges and execute the following command:
gpupdate
Windows should tell you that it has updated both Computer policy and User policy.
Verify that Your CA is Now a Trusted Root CA on the Windows Client
In a command prompt with administrative privileges, execute the following command to open the Microsoft Management Console (MMC):
mmc
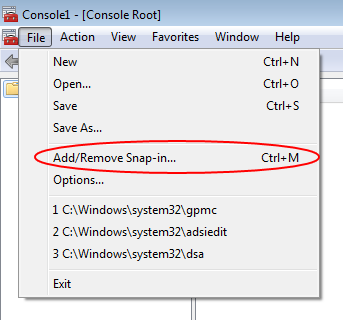
In the window that opens, go to the File menu and select "Add/Remove Snap-in..."
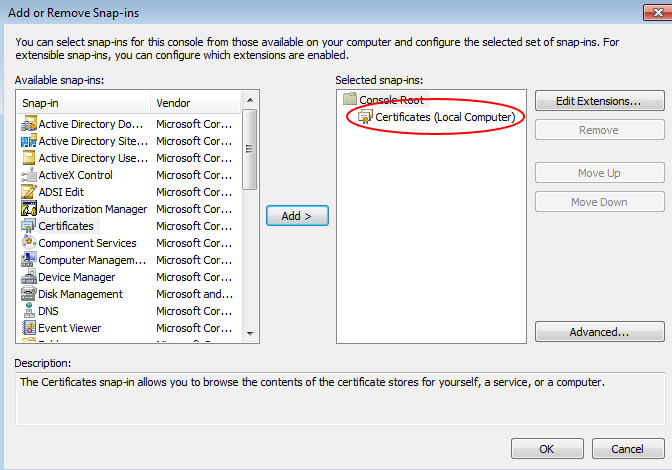
Select the "Certificates" snap-in from the list on the left hand side of the dialog box and click "Add", then choose "Computer account" in the dialog box that appears, and click "Next." Select "Local computer" in the next window, and click "Finish."
The right hand side of the "Add or Remove Snap-ins" window should now have an entry "Certificates (Local Computer)". If so, click "OK".
In the middle pane, double click on the item labeled "Certificates (Local Computer)," and then double-click on the "Trusted Root Certification Authorities" item that appears in the middle pane.

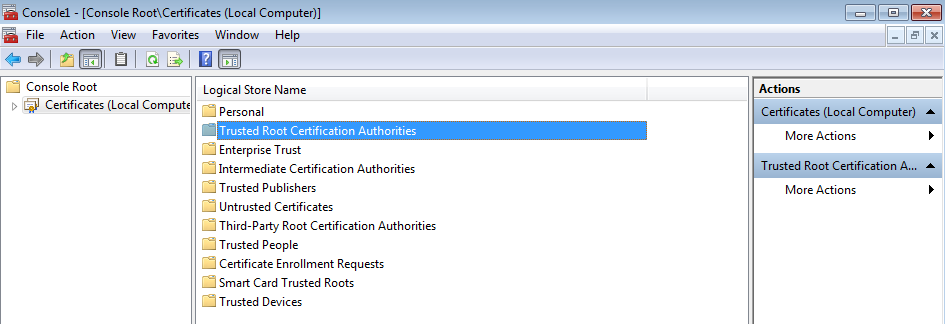
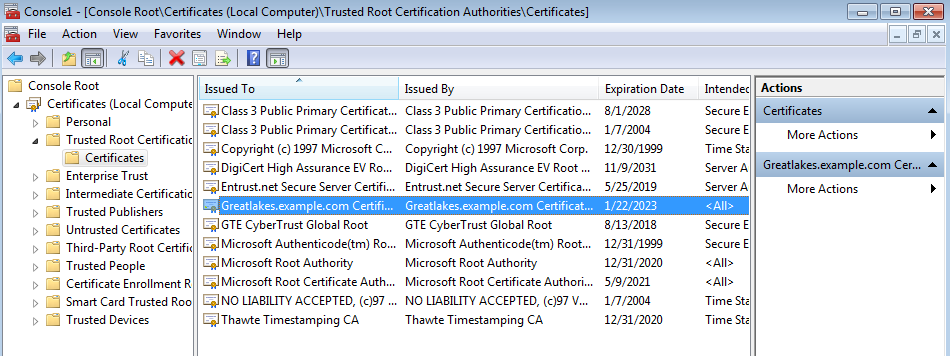
Double click on the lone "Certificates" item that now appears in the middle pane.
A list of certificates is displayed. Verify that your root certificate is among them.
Close the MMC window. You can safely select No when it asks you if you want to save.
Add the Root CA Certificate to the Domain's Enterprise NTAuth Store
On Windows Client PC, we also need to add the root CA certificate to the domain's Enterprise NTAuth store, by following Method 2 listed here. Specifically, at a command prompt with administrative privileges, execute the following command:
certutil -dspublish -f .\cacert.cer NTAuthCA
If all goes well, you should see the following output:
ldap:///CN=NTAuthCertificates,CN=Public Key Services,CN=Services,CN=Configuration,DC=greatlakes,DC=example,DC=com?cACertificate

Certificate added to DS store.

CertUtil: -dsPublish command completed successfully.
Import User Certificate to Smart Card
Unfortunately, how one does this largely depends on the smart card hardware you're using and the infrastructure you're setting up. The myriad permutations and considerations go far beyond the scope of this document.
One way is to use vSEC:CMS that is provided with PIVKey C910 Smart Card. And install its driver on every client PCs or assign the user Logon certificate to the appropriate slot on the Smart Card in order to use the default Windows minidriver without installing additional driver. See the manufacture's support website for more detail.
Another way is to use Firefox's Certificates panel (located in the Options Window under Advanced-Encryption). Firefox can use a PKCS#11 library/driver for your particular smart card as a Security Device; when the module is loaded in the Security Device panel and you've logged into the smart card, you can use the Certificates panel to add or remove the certificates installed on the smart card. You'll need to have a PKCS#11 library/driver for your card, and you'll need to have your user certificates/private keys packaged into PKCS#12 files in order to have Firefox import them onto the smart card.
Sidebar: Getting a PKCS#12 Version of a User Certificate

The Personal Information Exchange format (PFX, also called PKCS #12) supports secure storage of certificates, private keys, and all certificates in a certification path. The PKCS #12 format is the only file format that can be used to export a certificate and its private key. Converting to PKCS#12 and using the .p12certificate on your Smart Card will save you a lot of headache
Whatever the method, you will likely need to have a PKCS#12 file containing both your user's certificate private key in order to import them onto the smart card. You can do this with OpenSSL. The following command will create a PKCS#12 file for the Tina Admin user's certificate
openssl pkcs12 -in tinaadmin-cert.pem -inkey private/tinaadmin-key.pem -export -out tinaadmin.p12
You will prompted for a password three times. The first one is to decrypt the existing private key file. The second one is for a password to encrypt the private key when it is stored in the PKCS#12 file. The third one is to verify that you typed the second one correctly.
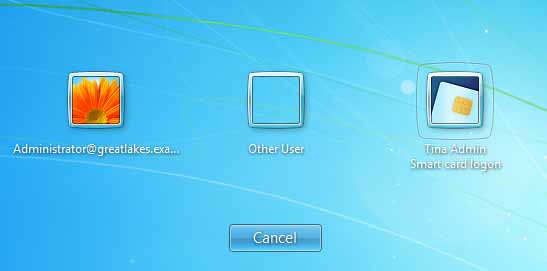
Log In!
At this point, if you log out from the domain-joined Windows client, and then insert the smart card with the user logon certificate installed on it, you should see a smart card icon on the Windows welcome screen. (You may have to press Escape and/or CTRL+ALT+DELETE a few times.)
Click on it, then enter the smartcard's PIN in the provided box.
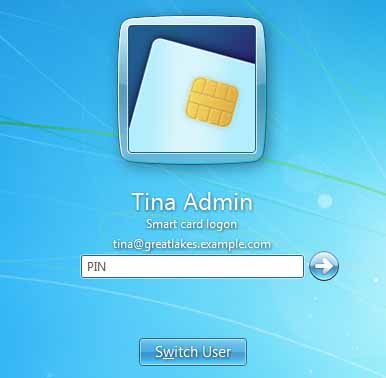
Provided you entered the correct PIN, you should be logged in to the Windows client. It might take some time for the very first Logon. You may need to wait. I got the
error message belowwhen logging in for the every first time. However after rebooting the server and PC, login was successful. Synchronization between Samba Domain and Windows sometimes takes a while.An untrusted certification authority was detected while processing the domain controller certificate used for authentication. Additional information may be available in the system event log. Please contact your administrator.
Additional Notes and Thoughts
Setting Up Additional Clients
After this procedure has been completed for the first time, other Windows clients in the same domain should work once they update group policy -- assuming they have the necessary smart card and smart card reader drivers installed. Clients joined to the domain at a later date will update group policy when they join the domain.
Adding New Smart Card Logon Users
To give another user the ability to login with a smart card, add the user to the directory, create a certificate for them (using their UPN), and put it on a smart card. The user will then be able to login to the domain with that smart card at properly set up workstations.


