VPN Single SignOn with Samba AD: Difference between revisions
No edit summary |
|||
| Line 244: | Line 244: | ||
--challenge=%{mschap:Challenge:-00} --nt-response=%{mschap:NT-Response:-00}" |
--challenge=%{mschap:Challenge:-00} --nt-response=%{mschap:NT-Response:-00}" |
||
} |
} |
||
''*Note: Do not forget set '''use_mppe = yes''' if you use '''require-mppe-128''' option in pptpd.conf'' |
|||
For more info about MS-CHAP, please see Andrew Bartlett paper on [ftp://ftp.samba.org/pub/unpacked/lorikeet/pppd/final-report.pdf Integrating Windows Authentication into a wireless VPN solution]. <BR> |
For more info about MS-CHAP, please see Andrew Bartlett paper on [ftp://ftp.samba.org/pub/unpacked/lorikeet/pppd/final-report.pdf Integrating Windows Authentication into a wireless VPN solution]. <BR> |
||
Revision as of 23:47, 29 October 2012
Creating a Single Sign On VPN with Samba4 on Ubuntu/Debian Server
These instructions are pretty rough, but they "worked for me" and I hope they give others some guidance. I've tried to go into as much detail as possible (painfully so) but I'm sure there are things that I'm missing. Please expand upon this HOWTO if you do find errors.
Overview
1. The purpose of this guide, is to provide an a step by step guidelines how to create a L2TP VPN server, which is fully integrated with the Samba4 Server.
Network Topology
2. Before we are going over how to actually build and configure the VPN server, we need first to understand about our network topology. Basically our network is construct with a Layer II switch, a Firewall Server (which in our case is also the network gateway), a one Samba4 Domain Controller and one or more linux/windows user machines.
                         NetID                                  --------- Windows XP - 172.16.0.10/24
                     172.16.0.0/24                             /
                         ------                   --------    /
                        |      |                 |        |  /
                        |      |                 |        | /
 Internet----Public-IP--|  FW  |--172.16.0.1/24--| Switch | ------------- Samba4 DC - 172.16.0.2/24
                        |      |                 |        | \
                        |      |                 |        |  \
                         ------                   --------    \
                                                               \
                                                                ---------- Fedora Linux - 172.16.0.50/24
Plese note that the Domain Controller (Samba4) can also be configure on the Firewall itself, but this is strongly not recommended due to a security issues.
Service Topology
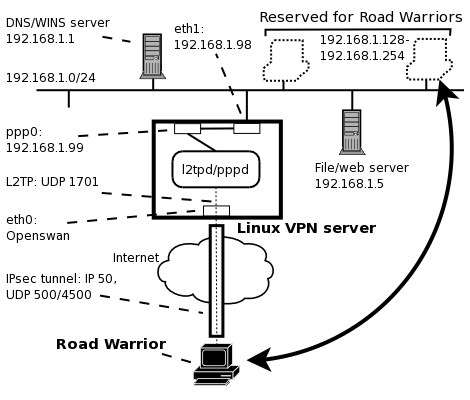
3. A L2TP VPN service is built from different kind of software, which are all integrated together. For a better understanding how it is working, please take a look in the following diagram:
http://www.jacco2.dds.nl/networking/topo.png
For more info please see Using a Linux L2TP/IPsec VPN server
Install & Configure Your Samba4 Domain Controller
4. This guide assume you have one/or more Samba4 Domain Controller runing in your network.
For the purpose of thie guide, I will refer to our Domain Controller host-name as "DC.Example.com" and our Domain Name as "Example.com". If you not familiar with how to install samba4 on Debian/Ubuntu Server, please see here.
Install & Configure a Radius Server
5. Once you have a Samba4 Server up and running, our next step is to install and configure a Radius Server as an alternative to the Microsoft IAS or NPS.
There are plenary of radius implementation in the open source community, but I truly recomended to go with the FreeRadius solution.
Please note the that in our example the FreeRadius software is installed on our firewall server. It is also possible to install it on the Domain Controller server, but since samba4 is still consider Alpha, I strongly recommend to keep it has native as possible, which will make it easy for updates and software upgrades.
6. Install the FreeRadius software on your Ubuntu/Debian Server
sudo apt-get install freeradius freeradius-common freeradius-krb5 freeradius-ldap freeradius-utils
7. Configure the Radius server parameters at /etc/freeradius/radiusd.conf (or, /etc/raddb/radiusd.conf) as following:
prefix = /usr
exec_prefix = /usr
sysconfdir = /etc
localstatedir = /var
sbindir = ${exec_prefix}/sbin
logdir = /var/log/freeradius
raddbdir = /etc/freeradius
radacctdir = ${logdir}/radacct
confdir = ${raddbdir}
run_dir = ${localstatedir}/run/freeradius
db_dir = ${raddbdir}
libdir = /usr/lib/freeradius
pidfile = ${run_dir}/freeradius.pid
max_request_time = 30
cleanup_delay = 5
max_requests = 1024

listen {
       type = auth
       ipaddr = 172.16.0.1
       port = 0
       interface = eth0
}
listen {
       type = auth
       ipaddr = 127.0.0.1
       port = 0
       interface = lo
}
listen {
       type = acct
       ipaddr = 172.16.0.1
       port = 0
       interface = eth0
}
listen {
       type = acct
       ipaddr = 127.0.0.1
       port = 0
       interface = lo
}

hostname_lookups = no
allow_core_dumps = no
regular_expressions     = yes
extended_expressions    = yes

log {
       destination = files
       file = ${logdir}/radius.log
       syslog_facility = daemon
       stripped_names = no
       auth = no
       auth_badpass = no
       auth_goodpass = no
}
checkrad = ${sbindir}/checkrad
security {
       max_attributes = 200
       reject_delay = 1
       status_server = yes
}
proxy_requests  = no
$INCLUDE clients.conf
thread pool {
       start_servers = 5
       max_servers = 32
       min_spare_servers = 3
       max_spare_servers = 10
       max_requests_per_server = 0
}
modules {
       $INCLUDE ${confdir}/modules/
}
instantiate {
       exec
       expr
       expiration
       logintime
}
$INCLUDE policy.conf
$INCLUDE sites-enabled/
Basically, What we have done here was to make the radius service bind to our main network interface (eth0 in my example), and to configure it for the type of packets to listen to (type=acct & type=auth).
If you install this service on the Domain Controller, make sure to change the ipaddr to your DC ip address.
8. Now we need to configure which clients can use the Radius service. This is done at the /etc/freeradius/clients.conf file. Please note that since in our example we have installed the FreeRadius on the Firewall server itself, the L2TP service which will define later connect to the Radius service via the local host, so basically there is nothing to do here except changing the default radius client password.
client localhost {
       ipaddr = 127.0.0.1
       netmask = 32
       secret          = samba4
       shortname       = localhost
}
However, if you have installed the FreeRadius server on the DC machine, then you will have to configure the FW server as a radius client member:
client 172.16.0.1 {
      secret      = samba4
      shortname   = fw
      nastype     = other
}
It is also a good advice to define here an additional client for debugging purpose. We will use it later, once we will try to test and if our Radius Server can authenticate with the Samba4 domain controller.
9. Our next step is to disable the inner tunnel requests for EAP-TTLS and PEAP types on the Radius Server. This can be easy done by deleting the inner-tunnel file at the /etc/freeradius/sites-enabled folder.
sudo rm -rf /etc/freeradius/sites-enabled/inner-tunnel
Eventually you should end up with the default site only, which should look like this:
authorize {
       preprocess
       auth_log
       chap
       mschap
       suffix
       ldap
       expiration
       logintime
       pap
}
authenticate {
       Auth-Type PAP {
               pap
       }
       Auth-Type CHAP {
               chap
       }
       Auth-Type MS-CHAP {
               mschap
       }
       Auth-Type LDAP {
               ldap
       }
}
preacct {
       preprocess
       acct_unique
       suffix
       files
}
accounting {
       detail
       radutmp
       attr_filter.accounting_response
}
session {
       radutmp
}
post-auth {
       exec
       Post-Auth-Type REJECT {
               attr_filter.access_reject
       }
}
pre-proxy {
}
post-proxy {
}
10. Our last task is to configure the FreeRaidus modules. There are at least one relevant module which need to be configure, which is the LDAP module.
Let's start configure first the LDAP module. You will have to configure it and change the required parameters to reflect your own configuration (Like the identity parameter (the user that bind to the LDAP server), the basedn (which in our example is DC=Example,DC=Com).
ldap {
       server = "DC"
       identity = "cn=VPN,cn=users,dc=example,dc=com"
       password = MyDomainVPN
       basedn = "dc=example,dc=com"
       filter = "(sAMAccountName=%{Stripped-User-Name:-%{User-Name}})"
       ldap_connections_number = 5
       timeout = 4
       timelimit = 3
       net_timeout = 1
       tls {
               start_tls = no
       }
       access_attr = "msNPAllowDialin"
       dictionary_mapping = ${confdir}/ldap.attrmap
       edir_account_policy_check = no
}
The most important parameter is the access_attr = "msNPAllowDialin", which is the file that tells our radius server, if the user is configure to allow a VPN access. The parameters change from TRUE to FALSE (case sensitive) via the ADUC Dial-in TAB:

11. If you want to use MS-CHAP or MS-CHAPv2 authentication, you will have to configure the winbind service on the firewall before continue.
Please Note: that as for version 4.0.0alpha12-GIT-1a27343 of Samba4, the ntlm_auth command, which is required for MS-CHAP or MS-CHAPv2 authentication, is still under development. So if you installed your FreeRadius under the Domain Controller, you will not be able to work with MS-CHAP or MS-CHAPv2 authentication. MS-CHAP or MS-CHAPv2 authentication only work at the moment with Samba3 versions. For more info about the status of winbind with samab4 please see here
mschap {
       use_mppe = no
       require_encryption = yes
       require_strong = yes
       with_ntdomain_hack = no
       ntlm_auth = "/usr/bin/ntlm_auth --request-nt-key --username=%{Stripped-User-Name:-%{User-Name:-None}} \
       --challenge=%{mschap:Challenge:-00} --nt-response=%{mschap:NT-Response:-00}"
}
*Note: Do not forget set use_mppe = yes if you use require-mppe-128 option in pptpd.conf
For more info about MS-CHAP, please see Andrew Bartlett paper on Integrating Windows Authentication into a wireless VPN solution.
One more good tutorial by Charles Schwartz about integration FreeRADIUS to AD can be found here.
12. At this point you should be able to test if the FreeRadius is working with the samba4 ldap server. For testing proposes, please change one of your existing users to get "Allow access" permission under the Dial-in TAB. I can recommend on using VACMAN RADIUS Client Simulator from Vasco which can really help for testing our FreeRadius configuration. If you do plan to test it, please remember to update your /etc/freeradius/clients.conf file, and defining the new radius client parameters. If everything goes fine, you will end up with this:


Or if you go with MS-CHAPv2

Install & Configure the L2TP Service
13. Our next step is to install a L2TP service. I personally prefer the implementation by the Xelerance Corporation, so this guide will assume you also will be using this service. (However, I would prefer to have a L2TP implementation that can support DHCP over IPSEC, but as far as I know it, no such software exists at the moment).
The Installation is quite simple using the apt-get engine exists in Debian/Ubuntu:
sudo apt-get install xl2tpd
Now we need to do some changes to /etc/xl2tpd/xl2tpd.conf configuration file:
[global]
port = 1701
[lns default]
ip range = 172.16.0.201-172.16.0.254
local ip = 172.16.0.200
require authentication = yes
name = VPN-Server
ppp debug = yes
pppoptfile = /etc/ppp/options.xl2tpd
length bit = yes
All we did is basically providing the ip address of the L2TP tunnel, and the ip address range for the VPN clients. The PPP option file (pppoptfile) is also very impotent deceleration, since it is were we tell the L2TP server to use our configured Radius Server.
My /etc/ppp/options.xl2tpd looks like that:
name VPN-Server
ipcp-accept-local
ipcp-accept-remote
proxyarp
ms-dns 172.16.0.1
idle 1800
connect-delay 5000
mtu 1410
mru 1410
lock
silent
auth
debug
refuse-pap
refuse-chap
refuse-mschap
require-mschap-v2
require-mppe-128
crtscts
noccp
novj
nobsdcomp
novjccomp
nodetach
nodefaultroute
noreplacedefaultroute
nologfd
plugin radius.so
plugin radattr.so
Please note that if you installed the Samba4 on the Firewall server, then MS-CHAP/MS-CHAPv2 authentication will not work, and you will need to use PAP authentication only, as following:
require-pap
refuse-chap
refuse-mschap
refuse-mschap-v2
One more thing you need to make sure about is the libradiusclient library. The xl2tpd service use the radius.so plug-in which exists in the ppp package. This plug-in depends on the libradiusclient library package. There are two libradiusclient packages exists in the Debian/Ubuntu repository, but I recommend to use the libradiusclient-ng2 package, with some minor tweaking which need to be done.
First we install the libradiusclient-ng2:
apt-get install libradiusclient-ng2
OpenSwan
14. xl2tpd
15. radius?
16. client config