Joining a Windows Client or Server to a Domain: Difference between revisions
(Created page with "= Configure a Windows Client to join our Samba Active Directory = Active Directory is a powerful administration service which enables an Administrator to centrally manage a netwo…") |
Mmuehlfeld (talk | contribs) (Replacing the "configure DNS settings" section with a link to the much more detailed section in the "DNS Administration HowTo" + some newlines for a better readability) |
||
| Line 1: | Line 1: | ||
= Configure a Windows Client to join our Samba Active Directory = |
= Configure a Windows Client to join our Samba Active Directory = |
||
Active Directory is a powerful administration service which enables an Administrator to centrally manage a network of Windows 2000, Windows XP Pro, Windows 2003, Windows Vista Business Edition, and Windows 7 Professional (and up) effectively. To test the real Samba capability, we use Windows XP Pro as testing environment (Windows XP Home doesn't include Active Directory functionality and won't work). |
Active Directory is a powerful administration service which enables an Administrator to centrally manage a network of Windows 2000, Windows XP Pro, Windows 2003, Windows Vista Business Edition, and Windows 7 Professional (and up) effectively. To test the real Samba capability, we use Windows XP Pro as testing environment (Windows XP Home doesn't include Active Directory functionality and won't work). |
||
| Line 8: | Line 9: | ||
# Configuring Date & Time and Time Zone |
# Configuring Date & Time and Time Zone |
||
# Joining the domain |
# Joining the domain |
||
== Step 1: Configure DNS Setting for Windows == |
== Step 1: Configure DNS Setting for Windows == |
||
See the [[DNS_Administration#Configuring_clients_to_use_your_AD_DNS_server|Configuring clients to use your AD DNS server]] section in the [[DNS_Administration|DNS Administration HowTo]]. |
|||
Before we configure the DNS settings, verify that you are able to ping the server's IP address. If you are not able to ping the server, double check your IP address, firewall, routing, etc. |
|||
Once you have verified network connectivity between the Samba server and client, |
|||
# Right Click My Network Places, Select Properties |
|||
# Right Click Local Area Network, Select Properties |
|||
# Double click TCP/IP |
|||
# Use a static DNS server, add the Samba server's IP address inside the Primary DNS Server Column. |
|||
#:[[Image:Samba4dnsclient.jpg]] |
|||
# Press OK on all opened windows. |
|||
# Open a command prompt, type 'ping samdom.example.com' (as per your provision). |
|||
If you get replies, then it means that your Windows settings are correct for DNS, and the Samba server's DNS service is working as well. |
|||
== Step 2: Configure Date & Time and Time Zone == |
== Step 2: Configure Date & Time and Time Zone == |
||
Active Directory uses Kerberos as the backend for authentication. Kerberos requires that the system clocks on the client and server be synchronized to within a few seconds of each other. If they are not synchronized, then authentication will fail for apparently no reason. |
Active Directory uses Kerberos as the backend for authentication. Kerberos requires that the system clocks on the client and server be synchronized to within a few seconds of each other. If they are not synchronized, then authentication will fail for apparently no reason. |
||
=== Configure the Date & Time === |
=== Configure the Date & Time === |
||
| Line 33: | Line 32: | ||
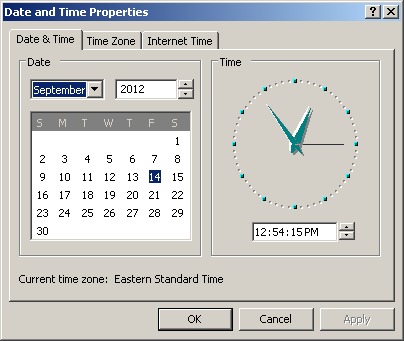
# Change the Date and Time so the client matches the server to the minute, and click OK |
# Change the Date and Time so the client matches the server to the minute, and click OK |
||
#:[[Image:Samba4time.jpg]] |
#:[[Image:Samba4time.jpg]] |
||
=== Configure the Time Zone === |
=== Configure the Time Zone === |
||
| Line 39: | Line 40: | ||
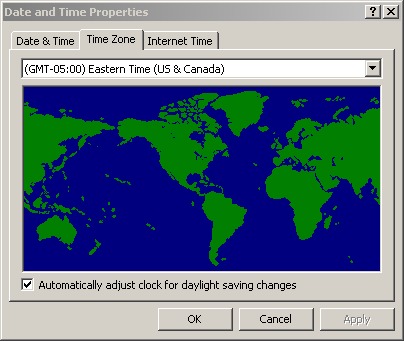
# Change the Time Zone to match the Time Zone on the server. |
# Change the Time Zone to match the Time Zone on the server. |
||
#:[[Image:Samba4timezone.jpg]] |
#:[[Image:Samba4timezone.jpg]] |
||
== Step 3: Joining Windows Clients to the Domain == |
== Step 3: Joining Windows Clients to the Domain == |
||
Revision as of 18:53, 11 July 2013
Configure a Windows Client to join our Samba Active Directory
Active Directory is a powerful administration service which enables an Administrator to centrally manage a network of Windows 2000, Windows XP Pro, Windows 2003, Windows Vista Business Edition, and Windows 7 Professional (and up) effectively. To test the real Samba capability, we use Windows XP Pro as testing environment (Windows XP Home doesn't include Active Directory functionality and won't work).
To allow Samba 4 Active Directory or Microsoft Active Directory to manage a computer, we need to join the computer into the active directory. It involves:
- Configuring DNS Settings
- Configuring Date & Time and Time Zone
- Joining the domain
Step 1: Configure DNS Setting for Windows
See the Configuring clients to use your AD DNS server section in the DNS Administration HowTo.
Step 2: Configure Date & Time and Time Zone
Active Directory uses Kerberos as the backend for authentication. Kerberos requires that the system clocks on the client and server be synchronized to within a few seconds of each other. If they are not synchronized, then authentication will fail for apparently no reason.
Configure the Date & Time
- Right-Click on the Time display in the system notification area, Select Adjust Date/Time.
- Change the Date and Time so the client matches the server to the minute, and click OK
Configure the Time Zone
- Right-Click on the Time display in the system notification area, Select Adjust Date/Time.
- Click on the Time Zone Tab
- Change the Time Zone to match the Time Zone on the server.
Step 3: Joining Windows Clients to the Domain
Now your Windows computer is ready to join the Active Directory (AD) domain,
As an Administrator:
- Right Click My Computer -> Properties
- Choose the Computer Name tab, click Change...
- Click option 'Domain', insert SAMDOM.EXAMPLE.COM. If this fails, try SAMDOM.
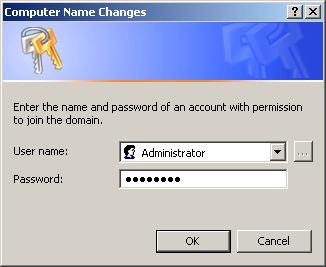
- When it requests a username and password, type Administrator as the username, and p4$$word as the password.
- You should get a message box stating "Welcome to the SAMDOM.EXAMPLE.COM domain."
- Click OK on this message box and the Properties window, and you will be instructed to restart your computer.
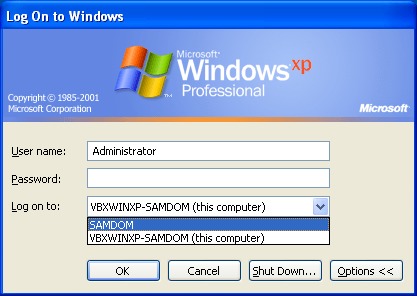
- After restarting, you should be presented with the normal logon dialog.
- Change the domain to SAMDOM and type Administrator as the username, and p4$$word as the password.


