Group Policy: Difference between revisions
| (49 intermediate revisions by 5 users not shown) | |||
| Line 2: | Line 2: | ||
This document describes how to manage domain members using Group Policy. |
This document describes how to manage domain members using Group Policy. |
||
= About Group Policy = |
= About Group Policy = |
||
| Line 10: | Line 14: | ||
On a Windows domain member, policies are enforced using the <code>gpupdate /force</code> command. |
On a Windows domain member, policies are enforced using the <code>gpupdate /force</code> command. |
||
= Configuring Group Policy = |
= Configuring Group Policy = |
||
== Enabling Group Policy == |
== Enabling Group Policy on a Domain Member == |
||
=== Winbind === |
=== Winbind === |
||
| Line 23: | Line 32: | ||
=== SSSD === |
=== SSSD === |
||
Group Policy application can be enforced using [https://github.com/ |
Group Policy application can be enforced using [https://github.com/openSUSE/oddjob-gpupdate oddjob-gpupdate]. The samba-gpupdate command from Samba must be installed. |
||
=== Windows === |
=== Windows === |
||
| Line 29: | Line 38: | ||
Group Policy is automatically enabled in Windows domain members. |
Group Policy is automatically enabled in Windows domain members. |
||
== Installing Samba ADMX Templates for the Group Policy Management Console == |
|||
== Samba Group Policies == |
|||
=== Installing Samba ADMX templates === |
|||
<code>samba-tool gpo admxload -UAdministrator</code> |
|||
In order to configure Samba Group Policies, you must first install the ADMX templates provided by Samba. |
|||
The ''samba-tool gpo admxload'' command copies the Samba ADMX templates to the ''<domain>''/Policies/PolicyDefinitions directory on the SYSVOL share. |
|||
{{Imbox |
|||
| type = note |
|||
| text = If you run the command without specifying which DC to use with '-H', the ADMX templates may be installed on another DC. |
|||
}} |
|||
To install [https://www.microsoft.com/en-us/download/102157 Microsoft's ADMX templates]: |
|||
msiextract /path/to/microsoft/download/Administrative\ Templates\ \(.admx\)\ for\ Windows\ 10\ October\ 2020\ Update.msi |
|||
samba-tool gpo admxload -UAdministrator --admx-dir=/path/to/extracted/msi/Program\ Files/Microsoft\ Group\ Policy/Windows\ 10\ October\ 2020\ Update\ \(20H2\)/PolicyDefinitions/ |
|||
{{Imbox |
{{Imbox |
||
| type = warning |
| type = warning |
||
| text = |
| text = If you install the Samba ADMX templates, you MUST also install Microsoft's ADMX templates, otherwise you will be unable to administer Windows domain members. |
||
}} |
}} |
||
$ samba-tool gpo admxload -U Administrator |
|||
== Setting Samba Group Policy in the Group Policy Management Console == |
|||
This command copies the Samba ADMX templates to the <code><domain>/Policies/PolicyDefinitions</code> directory on the SYSVOL share. |
|||
To set Samba Group Policy settings, open the Group Policy Management Console and either create a new Group Policy Object, or edit an existing one. |
|||
If you have more than one domain controller you should run the command with '-H' in order to insure the ADMX templates are installed on the correct DC; e.g. |
|||
$ samba-tool gpo admxload -H ldap://dc2.samdom.example.com -U Administrator |
|||
=== Installing Microsoft's ADMX templates === |
|||
To install Microsoft's ADMX templates, download the [https://learn.microsoft.com/en-US/troubleshoot/windows-client/group-policy/create-and-manage-central-store#links-to-download-the-administrative-templates-files-based-on-the-operating-system-version latest Administrative Templates] for your OS version, then (example with ADMX for Windows 10 2022): |
|||
<pre> |
|||
$ msiextract /path/to/microsoft/download/Administrative\ Templates\ \(.admx\)\ for\ Windows\ 10\ October\ 2022\ Update.msi |
|||
$ samba-tool gpo admxload -U Administrator --admx-dir=/path/to/extracted/msi/Program\ Files/Microsoft\ Group\ Policy/Windows\ 10\ October\ 2022\ Update\ \(22H2\)/PolicyDefinitions/</pre> |
|||
{{Imbox |
|||
| type = note |
|||
| text = The <code>msiextract</code> command can be found in the <code>msitools</code> package on most distributions, including Debian/Ubuntu, RHEL/CentOS, and Arch linux in the AUR. |
|||
}} |
|||
== Creating a Group Policy Object == |
== Creating a Group Policy Object == |
||
=== Group Policy Management Editor === |
|||
Open the Group Policy Management Console (which is part of Windows [[Installing_RSAT|RSAT]] tools). Highlight a policy, and select ''Edit'' from the Action menu to open the policy for editing. |
|||
== Group Policy Management Editor == |
|||
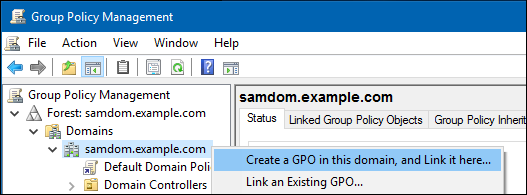
To create the Group Policy Object, highlight the domain or container where you want the object linked, then open the Action menu and select "Create a GPO in this domain, and Link it here". |
To create the Group Policy Object, highlight the domain or container where you want the object linked, then open the Action menu and select "Create a GPO in this domain, and Link it here". |
||
| Line 66: | Line 81: | ||
Enter the name of the new Group Policy in the dialog that appears, then click ok. |
Enter the name of the new Group Policy in the dialog that appears, then click ok. |
||
=== samba-tool === |
|||
== samba-tool == |
|||
Alternatively, to create a Group Policy Object from the command line, issue the <code>samba-tool gpo create</code> command. To then link it to a container, issue the <code>samba-tool gpo setlink</code> command. |
Alternatively, to create a Group Policy Object from the command line, issue the <code>samba-tool gpo create</code> command. To then link it to a container, issue the <code>samba-tool gpo setlink</code> command. |
||
| Line 75: | Line 89: | ||
== Group Policy Management Editor == |
=== Group Policy Management Editor === |
||
Highlight a policy, and select ''Edit'' from the Action menu to open the policy for editing. |
Open the Group Policy Management Console (which is part of Windows [[Installing_RSAT|RSAT]] tools). Highlight a policy, and select ''Edit'' from the Action menu to open the policy for editing. |
||
Samba policies can be found in the Group Policy Management Editor within User or Computer Configuration > Policies > Administrative Templates > Samba. For Samba Domain Controllers, the Password and Kerberos settings are also applied, which are found in Computer Configuration > Policies > OS Settings > Security Settings > Account Policy. |
Samba policies can be found in the Group Policy Management Editor within User or Computer Configuration > Policies > Administrative Templates > Samba. For Samba Domain Controllers, the Password and Kerberos settings are also applied, which are found in Computer Configuration > Policies > OS Settings > Security Settings > Account Policy. |
||
=== samba-tool === |
|||
== samba-tool == |
|||
Alternatively, some Group Policies can be managed using the <code>samba-tool gpo manage</code> command. |
Alternatively, some Group Policies can be managed using the <code>samba-tool gpo manage</code> command. |
||
== Listing Existing Group Policies == |
|||
List existing Group Policies using the <code>samba-tool gpo listall</code> command. |
|||
# samba-tool gpo listall -UAdministrator |
|||
GPO : {31B2F340-016D-11D2-945F-00C04FB984F9} |
|||
display name : Default Domain Policy |
|||
path : \\example.com\sysvol\example.com\Policies\{31B2F340-016D-11D2-945F-00C04FB984F9} |
|||
dn : CN={31B2F340-016D-11D2-945F-00C04FB984F9},CN=Policies,CN=System,DC=example,DC=com |
|||
version : 2097290 |
|||
flags : NONE |
|||
The first attribute of each GPO listed is the GUID (Globally Unique Identifier) of the GPO (in the form {31B2F340-016D-11D2-945F-00C04FB984F9}). You'll need this GUID in order to identify the GPO in other <code>samba-tool gpo</code> commands. |
|||
== Removing Policy from a Domain Member == |
|||
=== Linux Domain Member === |
|||
To remove policies applied to a domain member, issue the command: |
|||
samba-gpupdate --unapply --target=Computer |
|||
Or, to remove applied user policy: |
|||
samba-gpupdate --unapply --target=User -U<username> |
|||
Only a user with root privileges can remove applied policy. |
|||
=== Windows Domain Member === |
|||
Windows does not provide a feature for removing policy. The only work-around is to unjoin the domain, then force an apply with: |
|||
gpupdate /force /boot |
|||
= Linux Domain Member Policies = |
= Linux Domain Member Policies = |
||
Linux domain member policies are applied using the samba-gpupdate command. These policies are non-tatooing, meaning when a Group Policy Object is removed from a computer or user, the policies are also removed from the associated domain member. |
|||
For additional details on how to configure Linux Group Policies, see the [https://dmulder.github.io/group-policy-book/intro.html Group Policy on Linux documentation]. |
|||
== smb.conf Policies == |
== smb.conf Policies == |
||
smb.conf policies are found in Computer Configuration > Policies > Administrative Templates > Samba > smb.conf. These policies distribute smb.conf global options to the client. This policy is unable to apply idmap policies. |
|||
[https://dmulder.github.io/group-policy-book/smbconf.html smb.conf policies] are found in Computer Configuration > Policies > Administrative Templates > Samba > smb.conf. These policies distribute smb.conf global options to the client. This policy is unable to apply idmap policies. |
|||
== Password and Kerberos Policies == |
== Password and Kerberos Policies == |
||
Password and Kerberos policies, found in Computer Configuration > Policies > OS Settings > Security Settings > Account Policy, are only applicable to Samba Domain Controllers. |
|||
[https://dmulder.github.io/group-policy-book/sec.html Password and Kerberos policies], found in Computer Configuration > Policies > OS Settings > Security Settings > Account Policy, are only applicable to Samba Domain Controllers. |
|||
The following password policies are applicable: |
The following password policies are applicable: |
||
| Line 107: | Line 168: | ||
* Maximum service age (Maximum lifetime for service ticket) |
* Maximum service age (Maximum lifetime for service ticket) |
||
* Maximum renew age (Maximum lifetime for user ticket renewal) |
* Maximum renew age (Maximum lifetime for user ticket renewal) |
||
== Script Policies == |
== Script Policies == |
||
Script policies create cron jobs on client machines which execute the specified commands. Script policies are found in Computer Configuration > Policies > Administrative Templates > Samba > Unix Settings > Scripts. |
|||
[https://dmulder.github.io/group-policy-book/scripts.html Script policies] create cron jobs on client machines which execute the specified commands. Script policies are found in Computer Configuration > Policies > Administrative Templates > Samba > Unix Settings > Scripts. |
|||
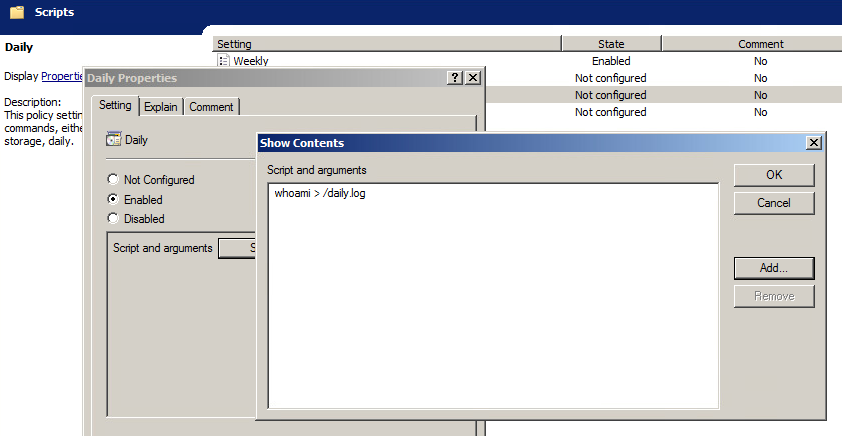
To add a script policy, open the policy, enable it, and click ''Show''. In the dialog that appears, add the command to execute on the client. Click OK, then Apply to save the policy. |
To add a script policy, open the policy, enable it, and click ''Show''. In the dialog that appears, add the command to execute on the client. Click OK, then Apply to save the policy. |
||
| Line 128: | Line 189: | ||
=== Startup Script Policies === |
=== Startup Script Policies === |
||
Startup script policies allow you to upload the script that will be executed to the SYSVOL, as well as scheduling the command to run at startup. These scripts can be set using the <code>samba-tool gpo manage scripts startup</code> command. |
[https://dmulder.github.io/group-policy-book/startupscripts.html Startup script policies] allow you to upload the script that will be executed to the SYSVOL, as well as scheduling the command to run at startup. These scripts can be set using the <code>samba-tool gpo manage scripts startup</code> command. |
||
For example: |
For example: |
||
| Line 134: | Line 195: | ||
samba-tool gpo manage scripts startup add {31B2F340-016D-11D2-945F-00C04FB984F9} test_script.sh '-n' |
samba-tool gpo manage scripts startup add {31B2F340-016D-11D2-945F-00C04FB984F9} test_script.sh '-n' |
||
This command would upload the local script <code>test_script.sh</code> to the SYSVOL, then schedule it to run on clients at startup and will pass the parameter '-n' to the script when it runs. |
This command would upload the local script <code>test_script.sh</code> to the SYSVOL, then schedule it to run on clients at startup and will pass the parameter '-n' to the script when it runs. The GUID {31B2F340-016D-11D2-945F-00C04FB984F9} specifies to which GPO the policy will be set. [[#Listing_Existing_Group_Policies|You can use the <code>samba-tool gpo listall</code> command to find the GUID for the GPO]]. |
||
=== Centrify Crontab Entries === |
|||
Samba provides an extension which adds compatibility with Centrify's Crontab Entries Group Policy. If you are currently using Centrify Group Policy to distribute Crontab entry policies, these will automatically be applied by samba-gpupdate. |
|||
== Files Policy == |
== Files Policy == |
||
The Files policy deploys files to client machines. These files are uploaded to the SYSVOL via the <code>samba-tool gpo manage files</code> command. |
|||
The [https://dmulder.github.io/group-policy-book/files.html Files policy] deploys files to client machines. These files are uploaded to the SYSVOL via the <code>samba-tool gpo manage files</code> command. |
|||
For example: |
For example: |
||
| Line 145: | Line 211: | ||
samba-tool gpo manage files add {31B2F340-016D-11D2-945F-00C04FB984F9} ./source.txt /usr/share/doc/target.txt root root 600 |
samba-tool gpo manage files add {31B2F340-016D-11D2-945F-00C04FB984F9} ./source.txt /usr/share/doc/target.txt root root 600 |
||
This command will upload the local file source.txt to the SYSVOL, which will then be deployed to client machines as /usr/share/doc/target.txt, with the ownership root:root, and the permissions 600. |
This command will upload the local file source.txt to the SYSVOL, which will then be deployed to client machines as /usr/share/doc/target.txt, with the ownership root:root, and the permissions 600. The GUID {31B2F340-016D-11D2-945F-00C04FB984F9} specifies to which GPO the policy will be set. [[#Listing_Existing_Group_Policies|You can use the <code>samba-tool gpo listall</code> command to find the GUID for the GPO]]. |
||
This policy is useful to use in conjunction with the Scripts policy. |
This policy is useful to use in conjunction with the Scripts policy. |
||
| Line 152: | Line 218: | ||
== Symlink Policies == |
== Symlink Policies == |
||
The symlink policy creates symbolic links on client machines. This policy is set via the <code>samba-tool gpo manage symlink</code> command. |
|||
The [https://dmulder.github.io/group-policy-book/symlink.html symlink policy] creates symbolic links on client machines. This policy is set via the <code>samba-tool gpo manage symlink</code> command. |
|||
For example: |
For example: |
||
| Line 158: | Line 225: | ||
samba-tool gpo manage symlink add {31B2F340-016D-11D2-945F-00C04FB984F9} /tmp/source /tmp/target |
samba-tool gpo manage symlink add {31B2F340-016D-11D2-945F-00C04FB984F9} /tmp/source /tmp/target |
||
This policy will cause clients to symlink the source to the target. |
This policy will cause clients to symlink the source to the target. The GUID {31B2F340-016D-11D2-945F-00C04FB984F9} specifies to which GPO the policy will be set. [[#Listing_Existing_Group_Policies|You can use the <code>samba-tool gpo listall</code> command to find the GUID for the GPO]]. |
||
== Sudoers Policies == |
== Sudoers Policies == |
||
Sudoers policies add sudo rules to client machines. Sudoers policies are found in Computer Configuration > Policies > Administrative Templates > Samba > Unix Settings > Sudo Rights. |
|||
[https://dmulder.github.io/group-policy-book/sudoers.html Sudoers policies] add sudo rules to client machines. Sudoers policies are found in Computer Configuration > Policies > Administrative Templates > Samba > Unix Settings > Sudo Rights. |
|||
To add a sudo policy, open the policy, enable it, and click ''Show''. In the dialog that appears, add the sudo rules to the list. Click OK, then Apply to save the policy. |
To add a sudo policy, open the policy, enable it, and click ''Show''. In the dialog that appears, add the sudo rules to the list. Click OK, then Apply to save the policy. |
||
| Line 181: | Line 249: | ||
== VGP Sudoers Policies == |
=== VGP Sudoers Policies === |
||
Another Sudoers extension is available for compatibility with Vintela's Sudoers Group Policy. The policy for this extension can be modified using the <code>samba-tool gpo manage sudo</code> command. |
Another Sudoers extension is available for compatibility with Vintela's Sudoers Group Policy. The policy for this extension can be modified using the <code>samba-tool gpo manage sudo</code> command. |
||
| Line 188: | Line 256: | ||
> samba-tool gpo manage sudoers add {31B2F340-016D-11D2-945F-00C04FB984F9} ALL ALL fakeu fakeg |
> samba-tool gpo manage sudoers add {31B2F340-016D-11D2-945F-00C04FB984F9} ALL ALL fakeu fakeg |
||
The GUID {31B2F340-016D-11D2-945F-00C04FB984F9} specifies to which GPO the policy will be set. [[#Listing_Existing_Group_Policies|You can use the <code>samba-tool gpo listall</code> command to find the GUID for the GPO]]. |
|||
This will create the following entry within /etc/sudoers.d: |
This will create the following entry within /etc/sudoers.d: |
||
| Line 201: | Line 271: | ||
fakeu,fakeg% ALL=(ALL) NOPASSWD: ALL |
fakeu,fakeg% ALL=(ALL) NOPASSWD: ALL |
||
=== Centrify Sudoers Policies === |
|||
<pre>Note: Samba Sudoers and VGP Sudoers policies can be safely used in conjunction with one another, since these policies are non-overlapping.</pre> |
|||
A third Sudoers extension is available to provide compatibility with Centrify's Sudoers Group Policy. If you are currently using Centrify Group Policy to distribute Sudoers policies, these will automatically be applied by samba-gpupdate. |
|||
{{Imbox |
|||
| type = note |
|||
| text = Samba Sudoers, VGP Sudoers, and Centrify Sudoers policies can be safely used in conjunction with one another, since these policies are non-overlapping. |
|||
}} |
|||
== Message Policies == |
== Message Policies == |
||
Message policies set the contents of the /etc/motd and /etc/issue files on client machines. Message policies are found in Computer Configuration > Policies > Administrative Templates > Samba > Unix Settings > Messages. |
|||
[https://dmulder.github.io/group-policy-book/msgs.html Message policies] set the contents of the /etc/motd and /etc/issue files on client machines. Message policies are found in Computer Configuration > Policies > Administrative Templates > Samba > Unix Settings > Messages. |
|||
To add a message of the day policy, for example, open the policy and enable it. In the text box provided, enter the message you'd like displayed after a successful login. |
To add a message of the day policy, for example, open the policy and enable it. In the text box provided, enter the message you'd like displayed after a successful login. |
||
| Line 221: | Line 299: | ||
== VGP Message Policies == |
=== VGP Message Policies === |
||
Other VGP Message extensions are available for compatibility with Vintela's MOTD and Issue Group Policies. The policies for these extensions can be modified using the <code>samba-tool gpo manage motd</code> and <code>samba-tool gpo manage issue</code> commands. |
Other VGP Message extensions are available for compatibility with Vintela's MOTD and Issue Group Policies. The policies for these extensions can be modified using the <code>samba-tool gpo manage motd</code> and <code>samba-tool gpo manage issue</code> commands. |
||
{{Imbox |
|||
<pre> Warning: Beware that applying both the Samba and VGP message policies will cause unpredictable behavior, since both policies will apply and will overwrite one another.</pre> |
|||
| type = warning |
|||
| text = Beware that applying both the Samba and VGP message policies will cause unpredictable behavior, since both policies will apply and will overwrite one another. |
|||
}} |
|||
== PAM Access Policies == |
== PAM Access Policies == |
||
PAM Access policies set access rules within /etc/security/access.d. These policies are set using the `samba-tool gpo manage access` command. This policy is compatible with Vintela's Access Group Policy. |
|||
[https://dmulder.github.io/group-policy-book/pamaccess.html PAM Access policies] set access rules within /etc/security/access.d. These policies are set using the `samba-tool gpo manage access` command. This policy is compatible with Vintela's Access Group Policy. |
|||
For example, to add an allow policy for the user (or group) goodguy in the domain example.com: |
For example, to add an allow policy for the user (or group) goodguy in the domain example.com: |
||
| Line 236: | Line 318: | ||
> samba-tool gpo manage access add {31B2F340-016D-11D2-945F-00C04FB984F9} allow goodguy example.com |
> samba-tool gpo manage access add {31B2F340-016D-11D2-945F-00C04FB984F9} allow goodguy example.com |
||
This will set the policy on the SYSVOL to the GPO specified by the |
This will set the policy on the SYSVOL to the GPO specified by the GUID {31B2F340-016D-11D2-945F-00C04FB984F9}. [[#Listing_Existing_Group_Policies|You can use the <code>samba-tool gpo listall</code> command to find the GUID for the GPO]]. |
||
linux-h7xz:~ # samba-gpupdate |
linux-h7xz:~ # samba-gpupdate |
||
| Line 249: | Line 331: | ||
-:example.com\goodguy:ALL |
-:example.com\goodguy:ALL |
||
== Certificate Auto Enrollment == |
== Certificate Auto Enrollment == |
||
| Line 258: | Line 339: | ||
== Firefox Policy == |
== Firefox Policy == |
||
Firefox policies can be administered using the mozilla templates [https://github.com/mozilla/policy-templates/releases available here]. To install the templates, issue the command: |
|||
[https://dmulder.github.io/group-policy-book/firefox.html Firefox policies] can be administered using the mozilla templates [https://github.com/mozilla/policy-templates/releases available here]. To install the templates, issue the command: |
|||
<code>samba-tool gpo admxload -UAdministrator --admx-dir=/path/to/mozilla/download/policy-templates/windows</code> |
<code>samba-tool gpo admxload -UAdministrator --admx-dir=/path/to/mozilla/download/policy-templates/windows</code> |
||
Once installed, the policies can be administered from the Group Policy Management Editor. |
Once installed, the policies can be administered from the Group Policy Management Editor (which is part of Windows [[Installing_RSAT|RSAT]] tools). |
||
Applying policy will generate two policy files on the local host: |
Applying policy will generate two policy files on the local host: |
||
| Line 274: | Line 356: | ||
== Chromium/Chrome Policy == |
== Chromium/Chrome Policy == |
||
Chromium and Google Chrome policies can be administered using the templates [https://dl.google.com/dl/edgedl/chrome/policy/policy_templates.zip available here]. To install the templates, issue the command: |
|||
[https://dmulder.github.io/group-policy-book/chrome.html Chromium and Google Chrome policies] can be administered using the templates [https://dl.google.com/dl/edgedl/chrome/policy/policy_templates.zip available here]. To install the templates, issue the command: |
|||
<code>samba-tool gpo admxload -UAdministrator --admx-dir=/path/to/google/download/policy_templates/windows/admx</code> |
<code>samba-tool gpo admxload -UAdministrator --admx-dir=/path/to/google/download/policy_templates/windows/admx</code> |
||
Once installed, the policies can be administered from the Group Policy Management Editor. |
Once installed, the policies can be administered from the Group Policy Management Editor (which is part of Windows [[Installing_RSAT|RSAT]] tools). |
||
Applying policy will generate four policy files on the local host: |
Applying policy will generate four policy files on the local host: |
||
| Line 292: | Line 375: | ||
== GNOME Settings == |
== GNOME Settings == |
||
GNOME Settings policies are found in the Group Policy Management Editor > Computer Configuration > Policies > Administrative Templates > Samba > GNOME when the default samba ADMX templates are installed. These templates can be installed by executing the command: |
|||
[https://dmulder.github.io/group-policy-book/gnome.html GNOME Settings policies] are found in the Group Policy Management Editor (which is part of Windows [[Installing_RSAT|RSAT]] tools) > Computer Configuration > Policies > Administrative Templates > Samba > GNOME when the default samba ADMX templates are installed. These templates can be installed by executing the command: |
|||
samba-tool gpo admxload -UAdministrator |
samba-tool gpo admxload -UAdministrator |
||
These policies manage some GNOME settings, such as the compose key, screen dimming, online account management, extensions, and the ability to disable printing, file saving, command line access, fingerprint logon, logout, user switching, and reparitioning. There is also a general method for disabling any specific GNOME lockdown value. |
These policies manage some GNOME user settings, [https://help.gnome.org/admin/system-admin-guide/stable/user-settings.html.en as described in the GNOME system admin guide], such as the compose key, screen dimming, online account management, extensions, and the ability to disable printing, file saving, command line access, fingerprint logon, logout, user switching, and reparitioning. There is also a general method for disabling any specific GNOME lockdown value. |
||
== OpenSSH Policy == |
== OpenSSH Policy == |
||
OpenSSH policy applies settings to /etc/ssh/sshd_config.d. These policies can be set using the <code>samba-tool gpo manage openssh</code> command. |
|||
[https://dmulder.github.io/group-policy-book/openssh.html OpenSSH policy] applies settings to /etc/ssh/sshd_config.d. These policies can be set using the <code>samba-tool gpo manage openssh</code> command. |
|||
For example, to require kerberos authentication in OpenSSH: |
For example, to require kerberos authentication in OpenSSH: |
||
> samba-tool gpo manage openssh set {31B2F340-016D-11D2-945F-00C04FB984F9} KerberosAuthentication Yes |
> samba-tool gpo manage openssh set {31B2F340-016D-11D2-945F-00C04FB984F9} KerberosAuthentication Yes |
||
The GUID {31B2F340-016D-11D2-945F-00C04FB984F9} specifies to which GPO the policy will be set. [[#Listing_Existing_Group_Policies|You can use the <code>samba-tool gpo listall</code> command to find the GUID for the GPO]]. |
|||
== Firewalld Policy == |
|||
[https://dmulder.github.io/group-policy-book/firewalld.html Firewalld policy] applies firewall rules using the firewall-cmd command. These policies can be found in the Group Policy Management Editor (which is part of Windows [[Installing_RSAT|RSAT]] tools) > Computer Configuration > Policies > Administrative Templates > Samba > Unix Settings > Firewalld when the default samba ADMX templates are installed. These templates can be installed by executing the command: |
|||
samba-tool gpo admxload -UAdministrator |
|||
The policy provides for the creation of rules and zones. Zones are defined as a list in the Zones setting in the Firewalld policy. Existing zones on the host will be unaffected. |
|||
Rules are defined using a JSON dictionary, containing zones paired with a list of rules. |
|||
For example, to create rules for the Work and Home zones, specify the following JSON: |
|||
{ |
|||
"work": [ |
|||
{"rule": {"family": "ipv4"}, "source address": "172.25.1.7", "service name": "ftp", "reject": {}}, |
|||
{"rule": {}, "source address": "172.25.1.8", "service name": "ftp", "reject": {}} |
|||
], |
|||
"home": [ |
|||
{"rule": {}, "protocol value": "icmp", "reject": {}}, |
|||
{"rule": {"family": "ipv4"}, "source address": "192.168.1.2/32", "service name": "telnet", "accept": {"limit value": "1/m"}} |
|||
] |
|||
} |
|||
The rule structure loosely follows the Firewalld Rich Language Documentation. |
|||
General rule structure: |
|||
{ |
|||
"rule": { |
|||
"family": "ipv4 | ipv6", |
|||
"priority": "priority" |
|||
}, |
|||
"source [not] address | mac | ipset": "address[/mask] | mac-address | ipset", |
|||
"destination [not] adress": "address[/mask]", |
|||
"service name": "service name", |
|||
"port": { |
|||
"port": "port value", |
|||
"protocol": "tcp | udp" |
|||
} |
|||
"protocol value": "protocol value", |
|||
"icmp-block name": "icmptype name", |
|||
"Masquerade": true|false, |
|||
"icmp-type": "icmptype name", |
|||
"forward-port": { |
|||
"port": "port value", |
|||
"protocol": "tcp | udp", |
|||
"to-port": "port value", |
|||
"to-addr": "address" |
|||
}, |
|||
"source-port": { |
|||
"port": "port value", |
|||
"protocol": "tcp | udp" |
|||
}, |
|||
"log": { |
|||
"prefix": "prefix text", |
|||
"level": "emerg | alert | crit | error | warning | notice | info | debug", |
|||
"limit value": "rate/duration" |
|||
}, |
|||
"audit": { |
|||
"limit value": "rate/duration" |
|||
}, |
|||
"accept" : { |
|||
"limit value": "rate/duration" |
|||
} | "reject": { |
|||
"type": "reject type", |
|||
"limit value": "rate/duration" |
|||
} | "drop": { |
|||
"limit value": "rate/duration" |
|||
} | "mark": { |
|||
"set": "mark[/mask]", |
|||
"limit value": "rate/duration" |
|||
} |
|||
} |
|||
= Windows Domain Member Policies = |
|||
== User Home Folders == |
|||
{{:Using_a_Group_Policy_Preference}} |
|||
== Folder Redirection == |
|||
{{:Configuring_Windows_Profile_Folder_Redirections_with_Group_Policy}} |
|||
== Restricted Groups == |
|||
{{:Managing_local_groups_on_domain_members_via_GPO_restricted_groups}} |
|||
= Resultant Set of Policy = |
= Resultant Set of Policy = |
||
The Resultant Set of Policy is a report indicating what policies have been, or what will be, applied to the local system. To display the Resultant Set of Policy, use the `samba-gpupdate --rsop` command: |
|||
The Resultant Set of Policy assists in troubleshooting policy implementation. It is a report indicating what policies have been, or what will be, applied to a domain member. |
|||
== Linux Domain Member == |
|||
To display the Resultant Set of Policy, use the <code>samba-gpupdate --rsop</code> command: |
|||
linux-h7xz:~ # samba-gpupdate --rsop |
linux-h7xz:~ # samba-gpupdate --rsop |
||
| Line 353: | Line 545: | ||
----------------------------------------------------------- |
----------------------------------------------------------- |
||
================================================================================================ |
================================================================================================ |
||
== Windows Domain Member == |
|||
To view the Resultant Set of Policy on a Windows domain member: |
|||
# Open the Microsoft Management Console |
|||
# Click File > Add/Remove Snap-in |
|||
# Select the Resultant Set of Policy, and then click Add. |
|||
# Click OK |
|||
---- |
---- |
||
[[Category:Active Directory]] |
[[Category:Active Directory]] |
||
[[Category:Group Policy Management]] |
|||
Latest revision as of 15:52, 6 December 2023
Introduction
This document describes how to manage domain members using Group Policy.
About Group Policy
Group Policy provides centralized management and configuration of operating system, application, and user settings. Policies are delivered to clients by listing them in LDAP, under groupPolicyContainer objects. These objects provide the gPCFileSysPath attribute, which points to policy information stored on the domains SYSVOL share. Policies are enforced at a random interval between 90 and 120 seconds.
Policies can be manually enforced on a Linux domain member using the samba-gpupdate --force command.
On a Windows domain member, policies are enforced using the gpupdate /force command.
Configuring Group Policy
Enabling Group Policy on a Domain Member
Winbind
To enable Group Policy application in winbind, set the global option apply group policies to yes.
apply group policies = yes
SSSD
Group Policy application can be enforced using oddjob-gpupdate. The samba-gpupdate command from Samba must be installed.
Windows
Group Policy is automatically enabled in Windows domain members.
Samba Group Policies
Installing Samba ADMX templates
In order to configure Samba Group Policies, you must first install the ADMX templates provided by Samba.
| If you install the Samba ADMX templates, you MUST also install Microsoft's ADMX templates, otherwise you will be unable to administer Windows domain members. |
$ samba-tool gpo admxload -U Administrator
This command copies the Samba ADMX templates to the <domain>/Policies/PolicyDefinitions directory on the SYSVOL share.
If you have more than one domain controller you should run the command with '-H' in order to insure the ADMX templates are installed on the correct DC; e.g.
$ samba-tool gpo admxload -H ldap://dc2.samdom.example.com -U Administrator
Installing Microsoft's ADMX templates
To install Microsoft's ADMX templates, download the latest Administrative Templates for your OS version, then (example with ADMX for Windows 10 2022):
$ msiextract /path/to/microsoft/download/Administrative\ Templates\ \(.admx\)\ for\ Windows\ 10\ October\ 2022\ Update.msi
$ samba-tool gpo admxload -U Administrator --admx-dir=/path/to/extracted/msi/Program\ Files/Microsoft\ Group\ Policy/Windows\ 10\ October\ 2022\ Update\ \(22H2\)/PolicyDefinitions/
The msiextract command can be found in the msitools package on most distributions, including Debian/Ubuntu, RHEL/CentOS, and Arch linux in the AUR. |
Creating a Group Policy Object
Group Policy Management Editor
Open the Group Policy Management Console (which is part of Windows RSAT tools). Highlight a policy, and select Edit from the Action menu to open the policy for editing.
To create the Group Policy Object, highlight the domain or container where you want the object linked, then open the Action menu and select "Create a GPO in this domain, and Link it here".
Enter the name of the new Group Policy in the dialog that appears, then click ok.
samba-tool
Alternatively, to create a Group Policy Object from the command line, issue the samba-tool gpo create command. To then link it to a container, issue the samba-tool gpo setlink command.
Editing a Group Policy Object
Group Policy Management Editor
Open the Group Policy Management Console (which is part of Windows RSAT tools). Highlight a policy, and select Edit from the Action menu to open the policy for editing.
Samba policies can be found in the Group Policy Management Editor within User or Computer Configuration > Policies > Administrative Templates > Samba. For Samba Domain Controllers, the Password and Kerberos settings are also applied, which are found in Computer Configuration > Policies > OS Settings > Security Settings > Account Policy.
samba-tool
Alternatively, some Group Policies can be managed using the samba-tool gpo manage command.
Listing Existing Group Policies
List existing Group Policies using the samba-tool gpo listall command.
 # samba-tool gpo listall -UAdministrator
 GPO          : {31B2F340-016D-11D2-945F-00C04FB984F9}
 display name : Default Domain Policy
 path         : \\example.com\sysvol\example.com\Policies\{31B2F340-016D-11D2-945F-00C04FB984F9}
 dn           : CN={31B2F340-016D-11D2-945F-00C04FB984F9},CN=Policies,CN=System,DC=example,DC=com
 version      : 2097290
 flags         : NONE
The first attribute of each GPO listed is the GUID (Globally Unique Identifier) of the GPO (in the form {31B2F340-016D-11D2-945F-00C04FB984F9}). You'll need this GUID in order to identify the GPO in other samba-tool gpo commands.
Removing Policy from a Domain Member
Linux Domain Member
To remove policies applied to a domain member, issue the command:
samba-gpupdate --unapply --target=Computer
Or, to remove applied user policy:
samba-gpupdate --unapply --target=User -U<username>
Only a user with root privileges can remove applied policy.
Windows Domain Member
Windows does not provide a feature for removing policy. The only work-around is to unjoin the domain, then force an apply with:
gpupdate /force /boot
Linux Domain Member Policies
Linux domain member policies are applied using the samba-gpupdate command. These policies are non-tatooing, meaning when a Group Policy Object is removed from a computer or user, the policies are also removed from the associated domain member.
For additional details on how to configure Linux Group Policies, see the Group Policy on Linux documentation.
smb.conf Policies
smb.conf policies are found in Computer Configuration > Policies > Administrative Templates > Samba > smb.conf. These policies distribute smb.conf global options to the client. This policy is unable to apply idmap policies.
Password and Kerberos Policies
Password and Kerberos policies, found in Computer Configuration > Policies > OS Settings > Security Settings > Account Policy, are only applicable to Samba Domain Controllers.
The following password policies are applicable:
- Minimum password age
- Maximum password age
- Minimum password length
- Password must meet complexity requirements
And Kerberos policies:
- Maximum ticket age (Maximum lifetime for user ticket)
- Maximum service age (Maximum lifetime for service ticket)
- Maximum renew age (Maximum lifetime for user ticket renewal)
Script Policies
Script policies create cron jobs on client machines which execute the specified commands. Script policies are found in Computer Configuration > Policies > Administrative Templates > Samba > Unix Settings > Scripts.
To add a script policy, open the policy, enable it, and click Show. In the dialog that appears, add the command to execute on the client. Click OK, then Apply to save the policy.
Script policies are applied as cron jobs on the winbind client.
 linux-h7xz:~ # /usr/sbin/samba-gpupdate --force
 linux-h7xz:~ # cat /etc/cron.daily/tmp6l0m809i
 #!/bin/sh
 whoami > /daily.log
Startup Script Policies
Startup script policies allow you to upload the script that will be executed to the SYSVOL, as well as scheduling the command to run at startup. These scripts can be set using the samba-tool gpo manage scripts startup command.
For example:
samba-tool gpo manage scripts startup add {31B2F340-016D-11D2-945F-00C04FB984F9} test_script.sh '-n'
This command would upload the local script test_script.sh to the SYSVOL, then schedule it to run on clients at startup and will pass the parameter '-n' to the script when it runs. The GUID {31B2F340-016D-11D2-945F-00C04FB984F9} specifies to which GPO the policy will be set. You can use the samba-tool gpo listall command to find the GUID for the GPO.
Centrify Crontab Entries
Samba provides an extension which adds compatibility with Centrify's Crontab Entries Group Policy. If you are currently using Centrify Group Policy to distribute Crontab entry policies, these will automatically be applied by samba-gpupdate.
Files Policy
The Files policy deploys files to client machines. These files are uploaded to the SYSVOL via the samba-tool gpo manage files command.
For example:
samba-tool gpo manage files add {31B2F340-016D-11D2-945F-00C04FB984F9} ./source.txt /usr/share/doc/target.txt root root 600
This command will upload the local file source.txt to the SYSVOL, which will then be deployed to client machines as /usr/share/doc/target.txt, with the ownership root:root, and the permissions 600. The GUID {31B2F340-016D-11D2-945F-00C04FB984F9} specifies to which GPO the policy will be set. You can use the samba-tool gpo listall command to find the GUID for the GPO.
This policy is useful to use in conjunction with the Scripts policy.
Symlink Policies
The symlink policy creates symbolic links on client machines. This policy is set via the samba-tool gpo manage symlink command.
For example:
samba-tool gpo manage symlink add {31B2F340-016D-11D2-945F-00C04FB984F9} /tmp/source /tmp/target
This policy will cause clients to symlink the source to the target. The GUID {31B2F340-016D-11D2-945F-00C04FB984F9} specifies to which GPO the policy will be set. You can use the samba-tool gpo listall command to find the GUID for the GPO.
Sudoers Policies
Sudoers policies add sudo rules to client machines. Sudoers policies are found in Computer Configuration > Policies > Administrative Templates > Samba > Unix Settings > Sudo Rights.
To add a sudo policy, open the policy, enable it, and click Show. In the dialog that appears, add the sudo rules to the list. Click OK, then Apply to save the policy.
 linux-h7xz:~ # /usr/sbin/samba-gpupdate --force
 linux-h7xz:~ # cat /etc/sudoers.d/gp_eockoryg

 ### autogenerated by samba
 #
 # This file is generated by the gp_sudoers_ext Group Policy
 # Client Side Extension. To modify the contents of this file,
 # modify the appropriate Group Policy objects which apply
 # to this machine. DO NOT MODIFY THIS FILE DIRECTLY.
 #

 tux ALL=(ALL) NOPASSWD: ALL
VGP Sudoers Policies
Another Sudoers extension is available for compatibility with Vintela's Sudoers Group Policy. The policy for this extension can be modified using the samba-tool gpo manage sudo command.
For example, to add an entry for the user 'fakeu':
> samba-tool gpo manage sudoers add {31B2F340-016D-11D2-945F-00C04FB984F9} ALL ALL fakeu fakeg
The GUID {31B2F340-016D-11D2-945F-00C04FB984F9} specifies to which GPO the policy will be set. You can use the samba-tool gpo listall command to find the GUID for the GPO.
This will create the following entry within /etc/sudoers.d:
 > cat /etc/sudoers.d/gp_XXXXX
 ### autogenerated by samba
 #
 # This file is generated by the gp_sudoers_ext Group Policy
 # Client Side Extension. To modify the contents of this file,
 # modify the appropriate Group Policy objects which apply
 # to this machine. DO NOT MODIFY THIS FILE DIRECTLY.
 #

 fakeu,fakeg% ALL=(ALL) NOPASSWD: ALL
Centrify Sudoers Policies
A third Sudoers extension is available to provide compatibility with Centrify's Sudoers Group Policy. If you are currently using Centrify Group Policy to distribute Sudoers policies, these will automatically be applied by samba-gpupdate.
| Samba Sudoers, VGP Sudoers, and Centrify Sudoers policies can be safely used in conjunction with one another, since these policies are non-overlapping. |
Message Policies
Message policies set the contents of the /etc/motd and /etc/issue files on client machines. Message policies are found in Computer Configuration > Policies > Administrative Templates > Samba > Unix Settings > Messages.
To add a message of the day policy, for example, open the policy and enable it. In the text box provided, enter the message you'd like displayed after a successful login.
 linux-h7xz:~ # samba-gpupdate
 linux-h7xz:~ # cat /etc/motd
 This message is distributed by Samba!
To add a login prompt policy, open the 'Logon Prompt Message' policy and enable it. In the text box provided, enter the message you'd like displayed before the login prompt. You can use escape sequences supported by the client /etc/issue file.
 linux-h7xz:~ # samba-gpupdate
 linux-h7xz:~ # cat /etc/issue
 Samba Group Policy \s \r \l
VGP Message Policies
Other VGP Message extensions are available for compatibility with Vintela's MOTD and Issue Group Policies. The policies for these extensions can be modified using the samba-tool gpo manage motd and samba-tool gpo manage issue commands.
| Beware that applying both the Samba and VGP message policies will cause unpredictable behavior, since both policies will apply and will overwrite one another. |
PAM Access Policies
PAM Access policies set access rules within /etc/security/access.d. These policies are set using the `samba-tool gpo manage access` command. This policy is compatible with Vintela's Access Group Policy.
For example, to add an allow policy for the user (or group) goodguy in the domain example.com:
> samba-tool gpo manage access add {31B2F340-016D-11D2-945F-00C04FB984F9} allow goodguy example.com
This will set the policy on the SYSVOL to the GPO specified by the GUID {31B2F340-016D-11D2-945F-00C04FB984F9}. You can use the samba-tool gpo listall command to find the GUID for the GPO.
 linux-h7xz:~ # samba-gpupdate
 linux-h7xz:~ # cat /etc/security/access.d/0000000001_gp.conf
 ### autogenerated by samba
 #
 # This file is generated by the vgp_access_ext Group Policy
 # Client Side Extension. To modify the contents of this file,
 # modify the appropriate Group Policy objects which apply
 # to this machine. DO NOT MODIFY THIS FILE DIRECTLY.
 #

 -:example.com\goodguy:ALL
Certificate Auto Enrollment
Certificate Auto Enrollment allows devices to enroll for certificates from Active Directory Certificate Services. It is enabled by Group Policy using Samba's samba-gpupdate command. Certificate Auto Enrollment is available in Samba 4.16 and above.
Configuring Certificate Auto Enrollment on the Server
Prerequisite: An Active Directory domain and a Samba domain member already joined.
The Windows server roles Certification Authority, Certificate Enrollment Policy Web Service, and Certificate Enrollment Web Service all must be installed and configured. The instructions here set up AD and CS on the same machine, this is not recommended! Check the Microsoft documentation how to set it up with multiple machines correctly.
Setting up the Certificate Authority
# Install Certificate Service Windows Features
Add-WindowsFeature -Name @('ADCS-Cert-Authority','ADCS-Enroll-Web-Pol','ADCS-Enroll-Web-Svc') -IncludeManagementTools

$addc = Get-ADDomainController
$realm = $addc.domain.ToUpper()
$dnsdomain = $addc.domain
$domain = $realm.split('\.')[0]
$hostname = $addc.hostname

# Setup Certificate Authority
$admin_creds = Get-Credential Administrator

# Details can be found at [1]
$params = @{
    CAType                  = "EnterpriseRootCA"
    CACommonName            = "$domain-ROOT-CA"
    CryptoProviderName      = "RSA#Microsoft Software Key Storage Provider"
    KeyLength               = 4096
    HashAlgorithmName       = "SHA512"
    OverwriteExistingCAinDS = $true
    OverwriteExistingKey    = $true
    Credential              = $admin_creds
    Force                   = $true
}
Install-AdcsCertificationAuthority @params
Request a Server Certificate for HTTPS from CA
Follow the instructions you can find here.
# Restart IIS
iisreset /restart
Setup Certificate Web Services
# Get the SSL Certificate Thumbprint of the Web Server
Import-Module WebAdministration
$certs = Get-ChildItem IIS:SSLBindings | Foreach-Object {
  [PSCustomObject]@{
     Site=$_.sites.value
     HostName=$_.Host
     Port=$_.Port
     Thumb=$_.thumbprint
  }
}

# Setup AdcsEnrollmentPolicyWebService
$params = @{
    AuthenticationType     = "Kerberos"
    SSLCertThumbprint      = $certs.thumb
    Credential             = $admin_creds
}
Install-AdcsEnrollmentPolicyWebService @params -Force

# AdcsEnrollmentWebService: Details can be found at [2]
$params = @{
    AuthenticationType     = "Kerberos"
    SSLCertThumbprint      = $certs.thumb
    Credential             = $admin_creds
}
Install-AdcsEnrollmentWebService @params -Force
Setup GPO for Auto Enrollment
# Set GPO for Auto Enrollment
Set-GPRegistryValue -Name "Default Domain Policy" -Key "HKEY_LOCAL_MACHINE\SOFTWARE\Policies\Microsoft\Cryptography\AutoEnrollment" -ValueName "AEPolicy" -Value 7 -Type "Dword"

Set-GPRegistryValue -Name "Default Domain Policy" -Key "HKEY_LOCAL_MACHINE\SOFTWARE\Policies\Microsoft\Cryptography\AutoEnrollment" -ValueName "OfflineExpirationPercent" -Value 10 -Type "Dword"
Set-GPRegistryValue -Name "Default Domain Policy" -Key "HKEY_LOCAL_MACHINE\SOFTWARE\Policies\Microsoft\Cryptography\AutoEnrollment" -ValueName "OfflineExpirationStoreNames" -Value "MY" -Type "String"

gpupdate /force

# AutoEnrollment successfully set up.
Get-CertificateAutoEnrollmentPolicy -Scope Applied -context Machine
Create Test Computer Certificate Template
You can follow the steps you can find here.
Additional Resources
- Certificate Authority Guidance
- Certificate Enrollment Web Service Guidance
- Configure server certificate auto-enrollment
- Configure HTTPS with an Enterprice CA
Enable Certificate Auto Enrollment on the Client
To setup Certificate Auto Enrollment:
- Install certmonger, and cepces. Samba uses certmonger paired with cepces to monitor the host certificate templates. Most distributions have a samba-gpupdate package which pulls in all the required packages for you.
- Join to an Active Directory domain (one where the CA has been previously configured as explained above).
- Run `samba-gpupdate` to install the certificates.
- Issue the `getcert list` to display the installed certificates:
Number of certificates and requests being tracked: 1.
Request ID 'Machine':
        status: MONITORING
        stuck: no
        key pair storage: type=FILE,location='/var/lib/samba/private/certs/Machine.key'
        certificate: type=FILE,location='/var/lib/samba/certs/Machine.crt'
        CA: <My CA>
        issuer: CN=<My CA>
        subject: CN=<my hostname>
        expires: 2017-08-15 17:37:02 UTC
        dns: <my hostname>
        key usage: digitalSignature,keyEncipherment
        eku: id-kp-clientAuth,id-kp-serverAuth
        certificate template/profile: Machine
        pre-save command:
        post-save command:
        track: yes
        auto-renew: yes
- To verify Certificate Auto Enrollment is correctly configured, issue the command `samba-gpupdate --rsop`:
Resultant Set of Policy
Computer Policy

GPO: Default Domain Policy
=================================================================================================================
CSE: gp_cert_auto_enroll_ext
-----------------------------------------------------------
Policy Type: Auto Enrollment Policy
-----------------------------------------------------------
[ <REDACTED CA NAME> ] =
[ CA Certificate ] =
----BEGIN CERTIFICATE----
<REDACTED>
----END CERTIFICATE----
[ Auto Enrollment Server ] = <REDACTED DNS NAME>
[ Templates ] =
[ Machine ]
-----------------------------------------------------------
=================================================================================================================
- Change the server variable in `/etc/cepces/cepces.conf` to point to the CA server.
- Set `keberos method = secrets and keytab` in the smb.conf
- Create a keytab for cepces-submit Kerberos authentication with `net ads keytab create`
- Enable group policy apply:
- For a Winbind joined machine by setting the smb.conf global parameter 'apply group policies = yes'.
- For a SSSD joined machine by installing the oddjob-gpupdate package.
| Samba's gpupdate will work with SSSD, but will require the oddjob-gpupdate package in order to apply policies automatically. |
Certificates
Certificates are installed in /var/lib/samba/certs and private keys are installed in /var/lib/samba/private/certs.
Firefox Policy
Firefox policies can be administered using the mozilla templates available here. To install the templates, issue the command:
samba-tool gpo admxload -UAdministrator --admx-dir=/path/to/mozilla/download/policy-templates/windows
Once installed, the policies can be administered from the Group Policy Management Editor (which is part of Windows RSAT tools).
Applying policy will generate two policy files on the local host:
 /usr/lib64/firefox/distribution/policies.json
 /etc/firefox/policies/policies.json
Both are valid Firefox policies, but the expected location for the policy template recently changed.
Chromium/Chrome Policy
Chromium and Google Chrome policies can be administered using the templates available here. To install the templates, issue the command:
samba-tool gpo admxload -UAdministrator --admx-dir=/path/to/google/download/policy_templates/windows/admx
Once installed, the policies can be administered from the Group Policy Management Editor (which is part of Windows RSAT tools).
Applying policy will generate four policy files on the local host:
 /etc/chromium/policies/managed/policies.json
 /etc/chromium/policies/recommended/policies.json
 /etc/opt/chrome/policies/managed/policies.json
 /etc/opt/chrome/policies/recommended/policies.json
The managed policy files specify required Chrome and Chromium settings, while the recommended policy files specify settings which will be applied but not enforced.
GNOME Settings
GNOME Settings policies are found in the Group Policy Management Editor (which is part of Windows RSAT tools) > Computer Configuration > Policies > Administrative Templates > Samba > GNOME when the default samba ADMX templates are installed. These templates can be installed by executing the command:
samba-tool gpo admxload -UAdministrator
These policies manage some GNOME user settings, as described in the GNOME system admin guide, such as the compose key, screen dimming, online account management, extensions, and the ability to disable printing, file saving, command line access, fingerprint logon, logout, user switching, and reparitioning. There is also a general method for disabling any specific GNOME lockdown value.
OpenSSH Policy
OpenSSH policy applies settings to /etc/ssh/sshd_config.d. These policies can be set using the samba-tool gpo manage openssh command.
For example, to require kerberos authentication in OpenSSH:
> samba-tool gpo manage openssh set {31B2F340-016D-11D2-945F-00C04FB984F9} KerberosAuthentication Yes
The GUID {31B2F340-016D-11D2-945F-00C04FB984F9} specifies to which GPO the policy will be set. You can use the samba-tool gpo listall command to find the GUID for the GPO.
Firewalld Policy
Firewalld policy applies firewall rules using the firewall-cmd command. These policies can be found in the Group Policy Management Editor (which is part of Windows RSAT tools) > Computer Configuration > Policies > Administrative Templates > Samba > Unix Settings > Firewalld when the default samba ADMX templates are installed. These templates can be installed by executing the command:
samba-tool gpo admxload -UAdministrator
The policy provides for the creation of rules and zones. Zones are defined as a list in the Zones setting in the Firewalld policy. Existing zones on the host will be unaffected.
Rules are defined using a JSON dictionary, containing zones paired with a list of rules.
For example, to create rules for the Work and Home zones, specify the following JSON:
 {
   "work": [
     {"rule": {"family": "ipv4"}, "source address": "172.25.1.7", "service name": "ftp", "reject": {}},
     {"rule": {}, "source address": "172.25.1.8", "service name": "ftp", "reject": {}}
   ],
   "home": [
     {"rule": {}, "protocol value": "icmp", "reject": {}},
     {"rule": {"family": "ipv4"}, "source address": "192.168.1.2/32", "service name": "telnet", "accept": {"limit value": "1/m"}}
   ]
 }
The rule structure loosely follows the Firewalld Rich Language Documentation.
 General rule structure:
 {
   "rule": {
     "family": "ipv4 | ipv6",
     "priority": "priority"
   },
   "source [not] address | mac | ipset": "address[/mask] | mac-address | ipset",
   "destination [not] adress": "address[/mask]",
   "service name": "service name",
   "port": {
     "port": "port value",
     "protocol": "tcp | udp"
   }
   "protocol value": "protocol value",
   "icmp-block name": "icmptype name",
   "Masquerade": true|false,
   "icmp-type": "icmptype name",
   "forward-port": {
     "port": "port value",
     "protocol": "tcp | udp",
     "to-port": "port value",
     "to-addr": "address"
   },
   "source-port": {
     "port": "port value",
     "protocol": "tcp | udp"
   },
   "log": {
     "prefix": "prefix text",
     "level": "emerg | alert | crit | error | warning | notice | info | debug",
     "limit value": "rate/duration"
   },
   "audit": {
     "limit value": "rate/duration"
   },
   "accept" : {
     "limit value": "rate/duration"
   } | "reject": {
     "type": "reject type",
     "limit value": "rate/duration"
   } | "drop": {
     "limit value": "rate/duration"
   } | "mark": {
     "set": "mark[/mask]",
     "limit value": "rate/duration"
   }
 }
Windows Domain Member Policies
User Home Folders
Using group policy preferences, you can assign settings to organizational units (OU) or to a domain. This enables you, for example, to automatically assign home folder paths to all users in the OU or domain. If you move the account to a different OU or domain, the setting is removed or updated. Using this way, you do not have to assign manually the setting to each user account.
To create a group policy object (GPO) for the domain that automatically assigns the \\server\users\user_name path as home folder to each user:
- Log in to a computer using an account that is allowed you to edit group policies, such as the AD domain
Administratoraccount.
- Open the
Group Policy Management Console. If you are not having the Remote Server Administration Tools (RSAT) installed on this computer, see Installing RSAT.
- Right-click to your AD domain and select
Create a GPO in this domain, and Link it here.
- Enter a name for the GPO, such as
Home folders on server. The new GPO is shown below the domain entry.
- Right-click to the newly-created GPO and select
Editto open theGroup Policy Management Editor.
- Navigate to the
User Configuration→Preferences→Windows Settings→Drive Mapsentry.
- Right-click to the
Drive Mapsentry and selectNew→Mapped Drive.
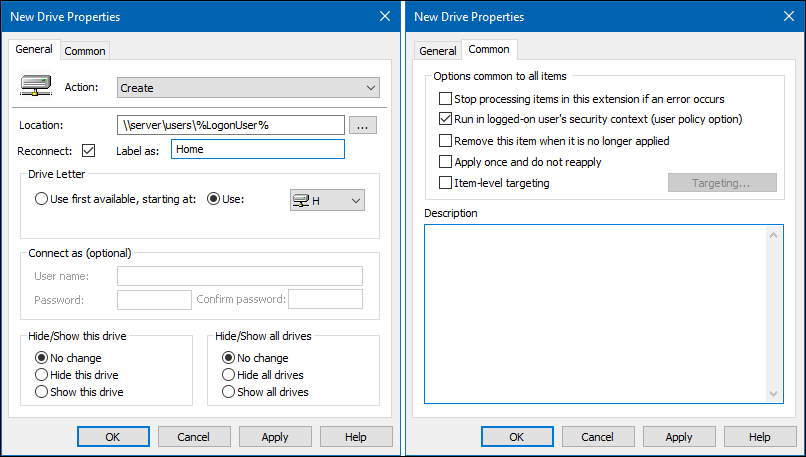
- Set the following:
- On the
Generaltab:
- Action:
Create - Location:
\\server\users\%LogonUser%
- Windows automatically replaces the
%LogonUser%variable when a user logs in
- Select
Reconnect - Label: Enter a string. For example:
Home - Use: Select a drive letter the home folder is mapped to.
- Action:
- On the
Commontab:
- Select
Run in logged-on user's security context (user policy option)
- Select
- On the
- Click
OK.
- Click
- Close the
Group Policy Management Editor. The GPOs are automatically saved on theSysvolshare on the domain controller (DC).
- Close the
Group Policy Management Console.
The policy is applied to users in the OU or domain, the policy is assigned to, during the next log in.
Folder Redirection
Using group policies, you can assign settings to organizational units (OU) or to a domain. This enables you, for example, to automatically set folder redirections to all users in the OU or domain. If you move the account to a different OU or domain, the settings are removed or updated. Using this way, you do not have to set the redirection manually for each user account.
Using Group Policy Folder Redirection
Using a group policy object (GPO) is the preferred way to set folder redirections.
Windows does not support dynamically-generated user home folders provided by the Samba [homes] section. If you used this way to provide home folders, set up a group policy preference instead. See Using a Group Policy Preference. |
To create a group policy object (GPO) for the domain that automatically redirects profile folders to user's home folder:
- Log in to a computer using an account that is allowed you to edit group policies, such as the AD domain
Administratoraccount.
- Open the
Group Policy Management Console. If you are not having the Remote Server Administration Tools (RSAT) installed on this computer, see Installing RSAT.
- Right-click to your AD domain and select
Create a GPO in this domain, and Link it here.
- Enter a name for the GPO, such as
Folder Redirections. The new GPO is shown below the domain entry.
- Right-click to the newly-created GPO and select
Editto open theGroup Policy Management Editor.
- Navigate to the
User Configuration→Policies→Windows Settings→Folder Redirectionentry.
- Right-click to the folder to redirect, such as
Documents, and selectProperties.
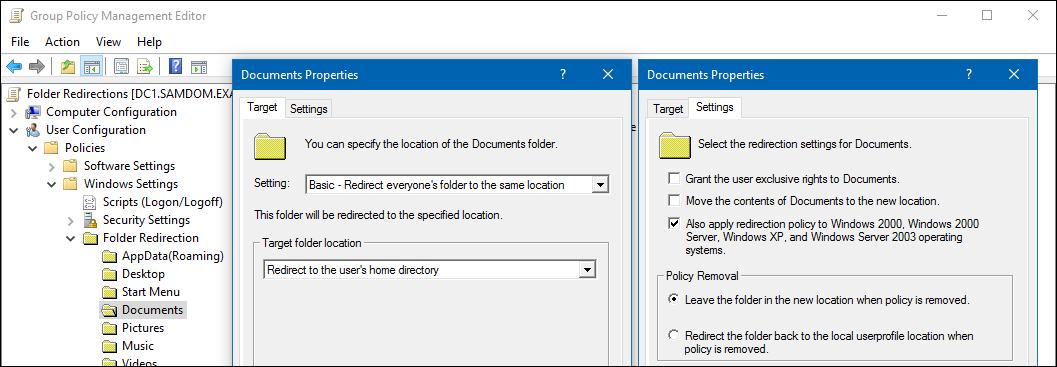
- Set the following:
- On the
Targettab:
- Setting:
Basic - Redirect everyone's folder to the same location - Target folder location:
Redirect to the user's home directory
- Setting:
- On the
Settingstab:
- Unselect
Grant the user exclusive rights. - Unselect
Move the contents of Documents to the new location. - Select
Also apply redirection to Windows 2000, Windows 2000 Server, Windows XP, and Windows Server 2003 operating systems. - Select
Leave the folder in the new location when policy is removed.
- Unselect
- On the
(If you choose to set these options differently and run into problems such as Event ID 502 in the application event log when a user logs in, see this Microsoft support article which boils down to either setting both Grant user exclusive and Also apply to Windows 2000 or neither of them.)
- Click
OK.
- Click
- Optionally, redirect other folders in the same way.
- Close the
Group Policy Management Editor. The GPOs are automatically saved on theSysvolshare on the domain controller (DC).
- Close the
Group Policy Management Console.
The policy is applied to users in domain at the next log in.
Using a Group Policy Preference
When you use the Samba [homes] section to dynamically generate user home folders, you must set registry keys using a group policy preference to redirect folders. If you provide home folders using a different share name, see Using Group Policy Folder Redirection.
To create a group policy preference for the domain that automatically redirects profile folders to user's home folder:
- Log in to a computer using an account that is allowed you to edit group policies, such as the AD domain
Administratoraccount.
- Open the
Group Policy Management Console. If you do not already have the Remote Server Administration Tools (RSAT) installed on this computer, see Installing RSAT.
- Right-click to your AD domain and select
Create a GPO in this domain, and Link it here.
- Enter a name for the GPO, such as
Folder Redirections. The new GPO is shown below the domain entry.
- Right-click to the newly-created GPO and select
Editto open theGroup Policy Management Editor.
- Navigate to the
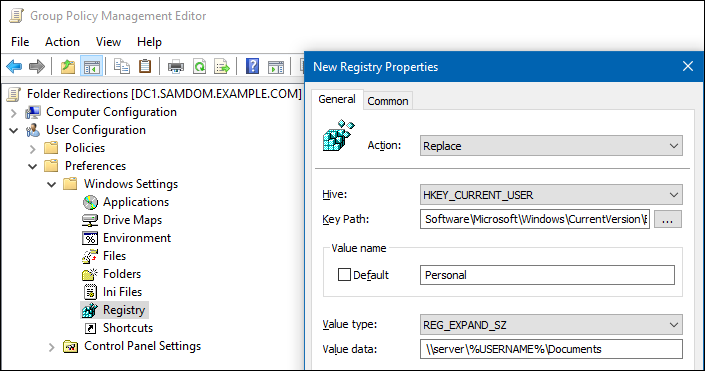
User Configuration→Preferences→Windows Settingsentry.
- Right-click to the
Registryentry in the navigation and selectNew→Registry Item.
- Set the following:
- Action:
Replace - Hive:
HKEY_CURRENT_USER - Key Path:
Software\Microsoft\Windows\CurrentVersion\Explorer\User Shell Folders - Value name: For example, to redirect the
Documentsfolder, enter:Personal
- For a list of other registry keys of folders you can redirect, see the
HKEY_CURRENT_USER\Software\Microsoft\Windows\CurrentVersion\Explorer\User Shell Foldersentry in your local Windows registry.
- Value type:
REG_EXPAND_SZ - Value data: For example:
\\server\%USERNAME%\Documents
- Windows automatically replaces the
%USERNAME%variable with the name of the current user when the policy is applied.
- Action:
- Optionally, redirect other folders in the same way.
- Close the
Group Policy Management Editor. The GPOs are automatically saved on theSysvolshare on the domain controller (DC).
- Close the
Group Policy Management Console.
The policy is applied to users in domain at the next log in.
Restricted Groups
Introduction
AD administrators often have the requirement to manage local group memberships of Windows workstations and servers from on a central way. Group Policies Restricted Groups is a simple way to accomplish this requirement and works in a Samba AD as well as in a MS controlled.
Restricted Groups are non-tatooing changes. This means, if you undo this change in the GPO, the changes are reset to their previous state on the affected computers after the next GPO refresh.
A best practice is, to use only AD groups instead of individual user accounts, to add to local groups. This allows changes on a central place (AD), by adding/removing members to/from the group, instead of modifying the GPO.
For simplicity, all examples in this documentation are configured on domain level through the Default Domain Policy. Needless to say, that is possible in self-created GPOs and OU-level, too.
Preconditions
- Installed Group Policy Management Console. It is part of the Remote Server Administration Tools (RSAT).
- The examples used below add a AD domain group „SAMDOM\Wks Admins“. Groups can be added to the AD using 'samba-tool' or Active Directory User and Computer (ADUC).
Modify local group membership and keep existing members
This is the most typical field of application: An AD group should be added as a member to a local group and all already existing members should be untouched.
Example: The AD domain group „SAMDOM\Wks Admins“ should be added to the local „Administrators“ group on all computers in the domain (workstations and server). The members of this domain group can be managed centrally in AD and allows member accounts to have local administrator permissions on all Windows computers, without knowing the Domain Administrator password or being member of the „Domain Admins“ group. All existing members in the local „Administrators“ group should stay. Only the domain group „SAMDOM\Wks Admins“should be added.
- Create a domain group „Wks Admins“, using 'samba-tool' or Active Directory Users and Computers from the Remote Server Administration Tools (RSAT).
- Open the Group Policy Management Console
- Select the "Default Domain Policy". Verify that the "Authenticated Users" principal is listed in the "Security Filters" list (this is the default). If the principal is not part of the list, add it. In case you removed this principal intentionally, you must alternatively add the computer account(s) to the list and grant "read" permissions. For details, see MS16-072.
- Right-click to „Default Domain Policy“ and choose „Edit...“
- The Group Policy Management Editor opens
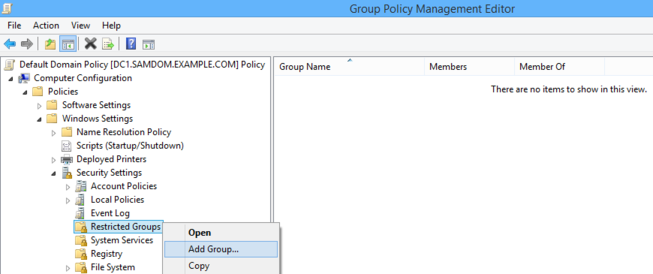
- Navigate and right-click to „Computer Configuration“ / „Policies“ / „Windows Settings“ / „Security Settings“ / „Restricted Groups“ and choose „Add group...“.
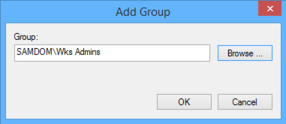
- Enter the name of the AD group „SAMDOM\Wks Admins“ by browsing your directory and click „OK“.
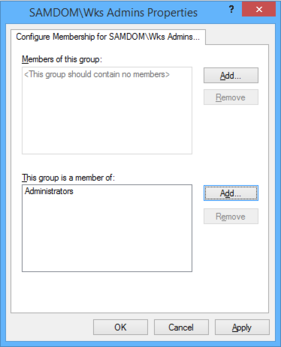
- The properties window opens. Click the „Add“ button next to the „This group is a member of“ box.
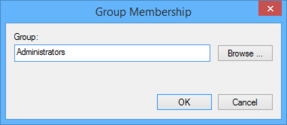
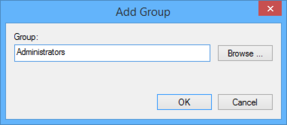
- Enter the local „Administrators“ group name. If you use the „Browse“ button, select the local computer, by using the „Locations...“ button in the upcomming window, to browse local instead of AD security objects!
- You see the local „Administrators“ group entry in the „This group is a member of“ list.
- Click „OK“.
After the clients have re-read the changed group policy, the domain group „SAMDOM\Wks Admins“ will appear in the local „Administrators“ group on each client affected by the GPO. All existing members of this group stay untouched.
Explicit control of local group membership
This way describes how to explicitly set the membership of a local group by replacing existing memberships with the ones defined in the GPO. Use this with care, to ensure that you don't break existing permissions of accounts used by users and applications!
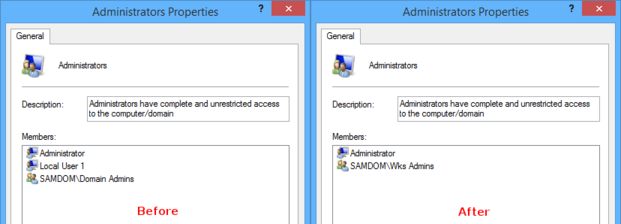
Example: On all computer in the domain (workstations and servers), the local Administrator and the domain group „SAMDOM\Wks Admins“ should be the only members of the local „Administrators“ group. All existing members of this group should be removed and just these two objects should be part of it.
- Create a domain group „Wks Admins“, using 'samba-tool' or Active Directory Users and Computers from the Remote Server Administration Tools (RSAT).
- Open the Group Policy Management Console
- Select the "Default Domain Policy". Verify that the "Authenticated Users" principal is listed in the "Security Filters" list (this is the default). If the principal is not part of the list, add it. In case you removed this principal intentionally, you must alternatively add the computer account(s) to the list and grant "read" permissions. For details, see MS16-072.
- Right-click to „Default Domain Policy“ and choose „Edit...“
- The Group Policy Management Editor opens
- Navigate and right-click to „Computer Configuration“ / „Policies“ / „Windows Settings“ / „Security Settings“ / „Restricted Groups“ and choose „Add group...“.
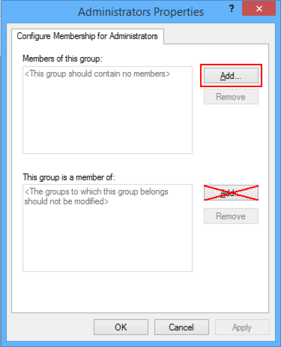
- Enter the local „Administrators“ group name. If you use the „Browse“ button, select the local computer, by using the „Locations...“ button in the upcomming window, to browse local instead of AD security objects!
- Click the „Add“ button next to the „Members of this group“ box.
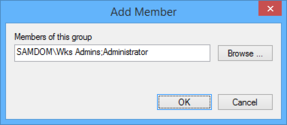
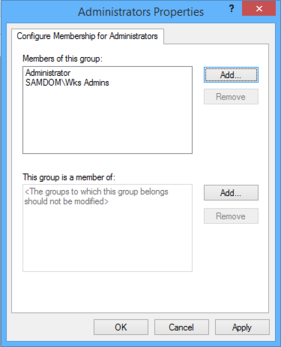
- Enter the domain group „SAMDOM\Wks Admins“ and the local „Administrator“ account. If you use the „Browse“ button, select the domain/local computer, by using the „Locations...“ button, to browse the domain/local security objects!
- You see the local „Administrator“ account and the AD group „SAMDOM\Wks Admins“ in the „Members of this group“ list.
- Click „OK“.
After the clients have re-read the changed group policy, only the local „Administrator“ account and then domain group „SAMDOM\Wks Admins“ will appear in the local „Administrators“ group on each client affected by the GPO. All previous members have been replaced by this new members.
Force manual group policy refresh
Windows computers refresh and apply group policies on changes per default every 90 minutes with a random offset of 0 to 30 minutes. See http://technet.microsoft.com/en-us/library/cc940895.aspx.
To see if changes took effect, you can force an immediate refresh of all GPOs on a host by running:
> gpupdate /force /target:computer
The „/target:computer“ option reads only the „Computer Configuration“ part of GPOs.
Resultant Set of Policy
The Resultant Set of Policy assists in troubleshooting policy implementation. It is a report indicating what policies have been, or what will be, applied to a domain member.
Linux Domain Member
To display the Resultant Set of Policy, use the samba-gpupdate --rsop command:
 linux-h7xz:~ # samba-gpupdate --rsop
 Resultant Set of Policy
 Computer Policy

 GPO: Default Domain Policy
 ================================================================================================
   CSE: gp_sec_ext
   -----------------------------------------------------------
   -----------------------------------------------------------
   CSE: gp_sec_ext
   -----------------------------------------------------------
   -----------------------------------------------------------
   CSE: gp_scripts_ext
   -----------------------------------------------------------
   -----------------------------------------------------------
   CSE: gp_sudoers_ext
   -----------------------------------------------------------
     Policy Type: Sudo Rights
     -----------------------------------------------------------
     [ tux ALL=(ALL) NOPASSWD: ALL ]
     -----------------------------------------------------------
   -----------------------------------------------------------
   CSE: gp_smb_conf_ext
   -----------------------------------------------------------
     Policy Type: smb.conf
     -----------------------------------------------------------
     [ apply group policies ] = 1
     [ client max protocol ] = SMB2_02
     -----------------------------------------------------------
   -----------------------------------------------------------
   CSE: gp_msgs_ext
   -----------------------------------------------------------
     Policy Type: /etc/motd
     -----------------------------------------------------------
 This message is distributed by Samba!
     -----------------------------------------------------------
     Policy Type: /etc/issue
     -----------------------------------------------------------
 Samba Group Policy \s \r \l
     -----------------------------------------------------------
   -----------------------------------------------------------
 ================================================================================================
Windows Domain Member
To view the Resultant Set of Policy on a Windows domain member:
- Open the Microsoft Management Console
- Click File > Add/Remove Snap-in
- Select the Resultant Set of Policy, and then click Add.
- Click OK
