Setting up Automatic Printer Driver Downloads for Windows Clients: Difference between revisions
Mmuehlfeld (talk | contribs) m (Fix link) |
|||
| (59 intermediate revisions by 7 users not shown) | |||
| Line 1: | Line 1: | ||
= Introduction = |
= Introduction = |
||
If you are running a Samba print server for Windows clients, you can upload drivers and preconfigure printers. If a user connects to a printer on the Samba server, Windows automatically downloads the driver and installs it locally. The user does not require local administrator permissions for the installation. Additionally, Windows applies preconfigured driver settings, such as paper sizes and the number of trays. |
|||
Windows Point'n'Print driver deployment is a process administrators uses to upload and preconfigure drivers on the print server. This allows users to simply connect a printer. The driver is downloaded from the print server automatically and used preconfigured settings. |
|||
{{Imbox |
|||
This documentation describes everything around this process. |
|||
| type = note |
|||
| text = Before you can set up automatic printer driver download, configure Samba as a print server and share a printer. For details, see [[Setting_up_Samba_as_a_Print_Server|Setting up Samba as a Print Server]]. |
|||
}} |
|||
| Line 9: | Line 12: | ||
= Supported Printer Drivers = |
|||
= Requirements = |
|||
== General Information == |
|||
* Samba is configured as a [[Setup_a_Samba_print_server|Print Server]]. |
|||
Many driver are provided in a way that enables you to upload them to your Samba print server: |
|||
* The [[Setup_a_Samba_print_server#Sharing_a_printer_with_Samba|printer is already shared via Samba]]. |
|||
* If the driver is provided in a compressed format, unpack the archive. |
|||
* Some drivers are require to start a setup application that installs the driver locally on a Windows host. In certain cases, the installer extracts the individual files into the operating system's temporary folder during the setup. To use the driver files for uploading them to a Samba print Server, start the installer, copy the files from the temporary folder to a new location, and cancel the installation. |
|||
Ask your printer vendor, if the driver supports uploading to a print server for automatic download by Windows operating systems. |
|||
== Supported Windows Printer Drivers == |
|||
Samba only supports the printer driver model version 3 that is supported in Windows 2000 to 10 and Windows Server 2000 to 2016. |
|||
= Uploading printer drivers for Point'n'Print driver installation= |
|||
To use package-aware drivers: |
|||
If you have already uploaded the driver for your printer in the past, you can skip this section. |
|||
* Run Samba 4.7 and later |
|||
* Enable the <code>spoolssd</code> service. For details, see [[Setting_up_Samba_as_a_Print_Server#Enabling_the_spoolssd_Service|Enabling the spoolssd Service]]. |
|||
The driver model version 4, introduced in Windows 8 and Windows Server 2012, is not supported in Samba. Use version 3 drivers instead. |
|||
<u>Important notes:</u> |
|||
* If you want to provide Point'n'Print support for drivers, used on different architectures (typically 32-bit and 64-Bit Windows), you have to upload a driver with the same name for all that architectures! This is the only way to define the default printer settings just once on a platform of your choice. And when the driver is sent to a host with a different architecture, these default values are used as well. But this requires, that the driver name is exactly the same for each platform. E. g. „HP Universal Printing PS“ for x86 and „HP Universal Printing PS (v5.5.0)“ for x64 would't match, as they are different! Choose exactly the same driver for all platforms, you want to support. |
|||
* Drivers for x64, can only be uploaded from a x64 Windows! Drivers for the x86 architecture can be uploaded from 32- and 64-bit Windows. |
|||
== 32-bit and 64-bit Drivers == |
|||
Printer drivers for the 64-bit Windows architecture, you can only upload from a Windows 64-bit operating system. 32-bit drivers you can upload from both 32-bit and 64-bit Windows operating systems. |
|||
The following steps are done on a 64-bit platform, because 64-bit Windows allows uploading drivers for x86 and x64: |
|||
To provide driver for both architectures, you must upload 32-bit and 64-bit drivers that uses exactly the same name for both architectures. For example, if you are uploading the 32-bit <code>HP Universal Printing PS</code> driver and the 64-bit <code>HP Universal Printing PS (v5.5.0)</code> driver for Windows, the driver names are different and cannot be used and preconfigured for the same printer. |
|||
* Logon with an account, that has [[Setup_a_Samba_print_server#Granting_print_operator_privileges|granted print operator privileges]] to. |
|||
* Start the „Print Management“ Console (printmanagement.msc). |
|||
* Expand the „Print Servers“ node. If your print server isn't listed, add it, via right-click / „Add/Remove Servers...“. |
|||
:[[Image:Add_Printserver.png]] |
|||
=== Uploading Only 64-bit Drivers to a Samba Print Server === |
|||
* Navigate to „Drivers“ below your print server. Right-click and choose „Add driver“ to upload a new driver to your server. |
|||
:[[Image:Print_Management_Add_Driver.png]] |
|||
Using the default setting, Samba reports itself as <code>Windows NT x86</code> architecture. Thus, 64-bit drivers stored on this print server can only be assigned to a printer if additionally a 32-bit driver with exactly the same name is uploaded. Otherwise, Windows does not display the driver in the list displayed in the printer's properties when assigning the driver. |
|||
* The „Add Printer wizzard will appear. |
|||
To provide only 64-bit driver on the Samba print server: |
|||
* Select the driver architecture you want to upload (upload one by one) and click „Next“. |
|||
* Add the following setting to the <code>[global]</code> section in your <code>smb.conf</code> file: |
|||
* Click the „Have Disk...“ button and browse to the directory containing the driver you want to upload. |
|||
spoolss: architecture = Windows x64 |
|||
* The wizzard will show you a list of all drivers, the directory you pointed to, contains. Select the appropriate driver for your printer and click „Next“. |
|||
:Remember: If you upload drivers for additional architectures for one printer, they need all to have exactly the same name! Otherwise the driver can't be associated and used with different platforms! |
|||
* Reload Samba: |
|||
:[[Image:Printer_driver_selection.png]] |
|||
# smbcontrol all reload-config |
|||
= Granting the <code>SePrintOperatorPrivilege</code> Privilege = |
|||
Only users and groups having the <code>SePrintOperatorPrivilege</code> privilege granted can upload and preconfigure printer drivers. You can grant this privilege to any user or group. |
|||
For example, to grant the privilege to the <code>Domain Admins</code> group, enter: |
|||
# net rpc rights grant "SAMDOM\Domain Admins" SePrintOperatorPrivilege -U "SAMDOM\administrator" |
|||
Enter SAMDOM\administrator's password: |
|||
Successfully granted rights. |
|||
{{Imbox |
|||
| type = note |
|||
| text = It is recommended to grant the privilege to a group instead of individual accounts. This enables you to add and revoke the privilege by updating the group membership. |
|||
}} |
|||
If you get the following error: |
|||
Could not connect to server 127.0.0.1 |
|||
The username or password was not correct. |
|||
Connection failed: NT_STATUS_LOGON_FAILURE |
|||
*Create in /etc/samba the file "user.map" |
|||
*Edit /etc/samba/user.map and add line: |
|||
!root = SAMDOM\administrator SAMDOM\Administrator |
|||
*Add in smb.conf to the [Global] section: |
|||
username map = /etc/samba/user.map |
|||
*Reload Samba: |
|||
# smbcontrol all reload-config |
|||
If you get the following error: |
|||
Could not connect to server 127.0.0.1 |
|||
Connection failed: NT_STATUS_INVALID_TOKEN |
|||
*Add in smb.conf to the [Global] section: |
|||
min domain uid = 0 |
|||
*Reload Samba: |
|||
# smbcontrol all reload-config |
|||
To list all users and groups having the <code>SePrintOperatorPrivilege</code> privilege granted, enter: |
|||
# net rpc rights list privileges SePrintOperatorPrivilege -U "SAMDOM\administrator" |
|||
SePrintOperatorPrivilege: |
|||
BUILTIN\Administrators |
|||
SAMDOM\Domain Admins |
|||
= Setting up the <code>[print$]</code> Share = |
|||
Windows downloads printer drivers from the <code>print$</code> share of a print server. This share name is hard-coded in Windows and cannot be changed. |
|||
To share the <code>/srv/samba/printer_drivers/</code> folder using the <code>print$</code> share name: |
|||
* Add the following section to your <code>smb.conf</code> file: |
|||
[print$] |
|||
path = /srv/samba/printer_drivers/ |
|||
read only = no |
|||
* Reload Samba: |
|||
# smbcontrol all reload-config |
|||
* Create the directory: |
|||
# mkdir -p /srv/samba/printer_drivers/ |
|||
* Set the permissions on the share. Users or groups having the <code>SePrintOperatorPrivilege</code> privilege granted must be able to to write to the share. For example, to set write access for the <code>Domain Admins</code> group and read permissions for other users to be able to download the drivers: |
|||
:* Using POSIX access control lists (ACL): |
|||
# chgrp -R "SAMDOM\Domain Admins" /srv/samba/printer_drivers/ |
|||
# chmod -R 2775 /srv/samba/printer_drivers/ |
|||
::{{Imbox |
|||
| type = note |
|||
| text = When setting up a Samba print server on an Active Directory (AD) domain controller (DC), you cannot use POSIX access control lists (ACL). Use the Windows utilities to set extended ACLs. For details, see [[Setting_up_a_Share_Using_Windows_ACLs#Enable_Extended_ACL_Support_in_the_smb.conf_File|Enable Extended ACL Support in the smb.conf File]]. |
|||
}} |
|||
:* Using Windows ACLs: |
|||
::Set the following permissions using the Windows utilities: |
|||
::{| class="wikitable" |
|||
!Principal |
|||
!Access |
|||
!Apply to |
|||
|- |
|||
|Creator Owner |
|||
|Full control |
|||
|Subfolders and files only |
|||
|- |
|||
|Authenticated Users |
|||
|Read & execute, List folder contents, Read |
|||
|This folder, subfolders and files |
|||
|- |
|||
|Domain Admins |
|||
|Full control |
|||
|This folder, subfolders and files |
|||
|} |
|||
::For details, see [[Setting_up_a_Share_Using_Windows_ACLs#Setting_Share_Permissions_and_ACLs|Setting Share Permissions and ACLs]]. |
|||
Samba automatically creates the architecture subdirectories on the <code>print$</code> share when uploading a driver. |
|||
= Creating a GPO for Trusting the Print Server = |
|||
{{Imbox |
|||
| type = important |
|||
| text = In July 2016, Microsoft released an update to fix security issues in the Windows print spooler. This update changes the behaviour and limited support for non-package-aware printer drivers. In October 2016, Microsoft published an update to mitigate these problems in an Active Directory (AD). For further details, see [https://support.microsoft.com/en-us/help/3170005/ms16-087-security-update-for-windows-print-spooler-components-july-12,-2016 MS16-087]. This section describes the procedure to work around the problems in an AD. |
|||
}} |
|||
To avoid installing malicious drivers from untrusted sources, Windows asks you if you trust the print server when you preconfigure a printer or when a user installs a printer. Create a group policy object (GPO) to trust the Samba print server and work around the known issues introduced by the Windows print spooler security update: |
|||
* Log in to a computer using an account that is allowed you to edit group policies, such as the AD domain <code>Administrator</code> account. |
|||
* Open the <code>Group Policy Management Console</code>. If you are not having the Remote Server Administration Tools (RSAT) installed on this computer, see [[Installing RSAT|Installing RSAT]]. |
|||
* Right-click to your AD domain and select <code>Create a GPO in this domain, and Link it here</code>. |
|||
:[[Image:GPMC_Create_GPO.png]] |
|||
* Enter a name for the GPO, such as <code>Legacy Printer Driver Policy</code>. The new GPO is shown below the domain entry. |
|||
* Right-click to the newly-created GPO and select <code>Edit</code> to open the <code>Group Policy Management Editor</code>. |
|||
* Navigate to the <code>Computer Configuration</code> → <code>Policies</code> → <code>Administrative Templates</code> → <code>Printers</code> entry. |
|||
:[[Image:GPME_Computer_Printer_GPOs.png]] |
|||
* Double-click to the <code>Point and Print Restriction</code> policy to edit the policy: |
|||
:* Enable the policy and set the following options: |
|||
::* Enable <code>Users can only point and print to these servers</code> and enter the fully-qualified domain name (FQDN) to the field. |
|||
::* Select <code>Do not show warning or elevation prompt</code> in both the <code>When installing drivers for a new connection</code> and <code>When updating drivers for an existing connection</code> list. |
|||
:::[[Image:GPO_Point_and_Print_Restrictions.png]] |
|||
:* Click <code>OK</code>. |
|||
* Double-click to the <code>Package Point and Print - Approved servers</code> policy to edit the policy: |
|||
:* Enable the policy and click the <code>Show</code> button. |
|||
::* Enter the print server's FQDN. For example: |
|||
:::[[Image:GPO_Package_Point_and_Print_Approved_Servers.png]] |
|||
::* Close both the content and policy properties by clicking <code>OK</code>. |
|||
* Close the <code>Group Policy Management Editor</code>. The GPOs are automatically saved on the <code>Sysvol</code> share on the domain controller (DC). |
|||
* Close the <code>Group Policy Management Console</code>. |
|||
Wait until the Windows domain members applied the group policy automatically. To apply the policy manually: |
|||
* Reboot the domain member. |
|||
* Run the following command using an account having local administrator permissions: |
|||
> gpupdate /force /target:computer |
|||
= Creating a GPO for RPC connection updates for print in Windows 11 = |
|||
{{Imbox |
|||
| type = important |
|||
| text = Windows 11, version 22H2 (October 2022) introduces changes to print components that modify how Windows machines communicate with each other during printing or print related operations. For example, the changes come into effect when you print to a printer shared out by a print server or another computer on the network. These changes were made to further improve the overall security of printing in Windows. The default configuration of the RPC connection settings enforces newer and more secure communication methods. Home users and enterprise administrators can also customize the settings for their environment. |
|||
}} |
|||
* Log in to a computer using an account that is allowed you to edit group policies, such as the AD domain <code>Administrator</code> account. |
|||
* Open the <code>Group Policy Management Console</code>. If you are not having the Remote Server Administration Tools (RSAT) installed on this computer, see [[Installing RSAT|Installing RSAT]]. |
|||
* Navigate to the <code>Computer Configuration</code> → <code>Policies</code> → <code>Administrative Templates</code> → <code>Configure RPC Connection settings</code> entry. |
|||
::[[Image:GPO_RPCconnectionsSettings.png]] |
|||
* Double-click to the <code>Configure RPC Connection settings</code> policy to edit the policy: |
|||
:* Enable the policy and set the following options: |
|||
::* Enable <code>RPC over named pipes</code>. |
|||
::[[Image:GPO_RPCconnectionsSettingsChange.png]] |
|||
::* Close both the content and policy properties by clicking <code>OK</code>. |
|||
* Close the <code>Group Policy Management Editor</code>. The GPOs are automatically saved on the <code>Sysvol</code> share on the domain controller (DC). |
|||
* Close the <code>Group Policy Management Console</code>. |
|||
Wait until the Windows domain members applied the group policy automatically. To apply the policy manually: |
|||
* Reboot the domain member. |
|||
* Run the following command using an account having local administrator permissions: |
|||
> gpupdate /force /target:computer |
|||
= Connecting to the Print Server Using the <code>Print Management</code> Console = |
|||
To connect to the Samba print server: |
|||
* Log on to a Windows host using an account that has the <code>SeDiskOperatorPrivilege</code> privilege granted and write permissions on the <code>print$</code> share. |
|||
* Click <code>Start</code>, enter <code>Print Management</code>, and start the application. |
|||
* Right-click to the <code>Print Servers</code> entry and select <code>Add/Remove Servers</code>. |
|||
* Enter the name of the Samba print server in the <code>Add servers</code> field, and click <code>Add to List</code>. |
|||
:[[Image:Print_Management_Add_Print_Server.png]] |
|||
* Click <code>OK</code>. |
|||
When you are connected to the print server, you can perform certain tasks, such as uploading drivers and preconfiguring printers. |
|||
= Uploading a Printer Driver to a Samba Print Server = |
|||
To upload a printer driver: |
|||
* Connect to the print server. See [[#Connecting_to_the_Print_Server_Using_the_Print_Management_Console|Connecting to the Print Server Using the Print Management Console]] |
|||
* Navigate to the <code>Print Servers</code> entry, double-click your print server, and right-click to the <code>Drivers</code> entry. |
|||
* Select <code>Add Driver</code>. |
|||
* In upcoming wizard, select the architecture you want to upload a driver for, and select <code>Next</code>. |
|||
* Click <code>Have Disk</code> and navigate to the folder containing the printer driver for the selected architecture. |
|||
* Select the driver to upload from the list. |
|||
:{{Imbox |
|||
* In the end, the wizzard will copy all required files to the print$ share of your print server. |
|||
| type = important |
|||
| text = When you upload 32-bit and 64-bit drivers for the same printer, both drivers must have exactly the same driver name. For details, see [[#32-bit_and_64-bit_Drivers|32-bit and 64-bit Drivers]]. |
|||
}} |
|||
* Click <code>Finish</code> to start uploading the driver to the <code>print$</code> share. |
|||
* If you want to upload drivers for a different plattform or other devices, repeat the steps. |
|||
* After uploading, the driver is shown in the <code>Drivers</code> menu. |
|||
* The drivers list in the Print Management Console provides you a clearly list of drivers on your printserver and for which platform they are available. |
|||
:[[Image:Print_Management_Driver_List.png]] |
:[[Image:Print_Management_Driver_List.png]] |
||
Optionally, upload drivers for additional architectures. |
|||
= Associating a shared printer with a driver and preconfiguring= |
|||
* Logon with an account, that has [[Setup_a_Samba_print_server#Granting_print_operator_privileges|granted print operator privileges]] to. |
|||
* Start the „Print Management“ Console (printmanagement.msc). |
|||
= Assigning a Driver to a Printer = |
|||
* Expand the „Print Servers“ node. If your print server isn't listed, add it, via right-click / „Add/Remove Servers...“. |
|||
:[[Image:Add_Printserver.png]] |
|||
== Using the <code>Print Management</code> Console == |
|||
* If you navigate to the „Printers“ node for your Print Server, you see a list of all shared printers. |
|||
:[[Image:View_remote_printers.png]] |
|||
To assign a driver to a printer using the Windows <code>Print Management</code> console: |
|||
* Connect to the print server. See [[#Connecting_to_the_Print_Server_Using_the_Print_Management_Console|Connecting to the Print Server Using the Print Management Console]] |
|||
:* On Windows: |
|||
* Navigate to the <code>Print Servers</code> entry, double-click your print server, and select the <code>Printers</code> entry. |
|||
::* Right-click to the shared printer, you would associate a driver with and choose „Properties“. |
|||
* Right-click to the printer and select <code>Properties</code>. |
|||
::* If there's no driver associated with an printer yet, you'll been asked if you want to install the driver now. Answer this question with „No“! |
|||
:::[[Image:Question_install_driver.png]] |
|||
:[[Image:Print_Management_Printer_Properties.png]] |
|||
::* A default printer properties window will appear. Go to the „Advanved“ tab and choose the already uploaded driver from the list, that is suitable for the printer. |
|||
:::[[#An_uploaded_driver_is_not_shown_in_the_list.2C_when_trying_to_associate_it_with_a_printer|FAQ: An uploaded driver is not shown in the list, when trying to associate it with a printer]]. |
|||
:::[[Image:Choose_driver.png]] |
|||
* When no driver is associated with the printer, the following warning is shown: |
|||
:::''Note: You may receive an „Printer settings could not be saved. Operation could not be completed (error 0x0000007a) error. This can be ignored. The changes are saved anyway. See [https://bugzilla.samba.org/show_bug.cgi?id=10482 Bug #10482]. |
|||
:[[Image:Print_Management_Driver_Not_Found_Message.png]] |
|||
::* Close the windows with „OK“ to associate the driver with the printer. |
|||
: Click <code>No</code>. The driver is selected in a later step from the list of uploaded drivers. |
|||
::* If you do this step on Vista or higher, Windows will ask you, if you trust the server (This can be suppressed by a GPO. See [[Defining_printer_driver_sources_trusts|Setting up a GPO for trusting printer drivers]]). Choose „Install driver“, if you are seeing this window. |
|||
:::[[Image:Question_trust_printer.png]] |
|||
* Navigate to the <code>Advanced</code> tab and select the driver from the list. For example: |
|||
::* After associating the driver, Windows renames the printer to the driver name. You can leave that or rename it again. For more clearness, it's better to set the name on Windows side to the one you used in your smb.conf. |
|||
:[[Image:Print_Management_Select_Driver.png]] |
|||
:::''Note: Renaming the printer via the Printer Management Console is only possible by editing the printers properties - not via [F2] (See [https://bugzilla.samba.org/show_bug.cgi?id=10770 Bug #10770]).'' |
|||
: If you uploaded only a 64-bit driver and the driver is not displayed in the list, see [[#Uploading_Only_64-bit_Drivers_to_a_Samba_Print_Server|Uploading Only 64-bit Drivers to a Samba Print Server]]. |
|||
:* On *nix: |
|||
* Click <code>OK</code> to set the driver for the printer. |
|||
::* Retrieve a list of all drivers, that are on the print$ share <pre># rpcclient localhost -U administrator -c 'enumdrivers'</pre> |
|||
: If a warning is displayed, cancel the operation and set up a group policy to trust drivers provided by this print server. For details, see [[#Creating_a_GPO_for_Trusting_the_Print_Server|Creating a GPO for Trusting the Print Server]]. |
|||
:[[Image:Trust_Print_Server_Warning.png]] |
|||
::* Associate the driver with the printer (The driver name, must be exactly the same, like in the output of the above „enumdrivers“ output): <pre># rpcclient localhost -U administrator -c 'setdriver "MyDemoPrinter" "HP Universal Printing PS"'</pre> |
|||
* After the driver is assigned to the printer, Windows automatically renames the printer to the name of the printer driver. It is recommended, to manually reset the name to the printer name set in the <code>smb.conf</code> file: |
|||
::* You can review the associations with <pre># rpcclient localhost -U administrator -c 'enumprinters'</pre> |
|||
:* Right-click to the printer and select <code>Rename</code>. |
|||
:* Reset the printer name to the name set in the <code>smb.conf</code> file, and press <code>Enter</code>. |
|||
:* If the printer list is not refreshed automatically, press the <code>[F5]</code> key. |
|||
* On Windows, now right-click and choose „Properties“ again, to preconfigure the printer. |
|||
* First you should take a look on the tabs on the properties windows. Typically there's a tab called „Device Settings“, „Settings“, „Configuration“ or something like that (depending on the driver). This usually allows you to configure the main printer settings (number of trays, duplex on/off, etc.). Set the values fitting to your device and click the „Apply“ button. |
|||
:[[Image:Device_Settings.png]] |
|||
== Using the Samba <code>rpcclient</code> Utility == |
|||
* On the „Sharing“ tab, you can check „List in the directory“, to publish the printer in your Active Directory, what makes it easier for users to find. |
|||
To assign a driver to a printer locally on a Samba print server using the <code>rpcclient</code> utility: |
|||
* To preconfigure the printers default settings, go to the „Advanced“ tab and click the „Printing defaults...“ button. A new window will appear. It's layout and possibilities differ and depent on the driver. Here you can set the default values, the user will receive, when connecting the printer. |
|||
:[[Image:Printing_defaults.png]] |
|||
* List all drivers available on the <code>print$</code> share: |
|||
* If you have finished configuring your printer, save all changes with „OK“. |
|||
# rpcclient localhost -U "SAMDOM\administrator" -c "enumdrivers" |
|||
If you had uploaded drivers for multiple architectures to that printer, the settings will be retrieved connecting on the different plattforms - regardless on which they have been set. But as mentioned earlier, this requires, that all drivers for each plattform have the same name (versions can differ). |
|||
* Assign the driver to the printer. For example, to assign the <code>HP Universal Printing PS</code> driver to the <code>DemoPrinter</code> printer, enter: |
|||
Now it's time to connect to the printer and print a test page. |
|||
# rpcclient localhost -U "SAMDOM\administrator" -c 'setdriver "DemoPrinter" "HP Universal Printing PS"' |
|||
* To verify the result: |
|||
# rpcclient localhost -U "SAMDOM\administrator" -c "enumprinters" |
|||
= FAQ = |
|||
== An uploaded driver is not shown in the list, when trying to associate it with a printer == |
|||
Windows clients only permit associating a driver with a printer, when the uploaded driver matches the architecture reported by the spoolss server. Samba reports "Windows NT x86" by default. |
|||
= Preconfiguring a Printer = |
|||
This causes, that when you had uploaded just a 64-bit driver, you won't see it in the list, when you try to associate it with the printer it's „advanced“ tab. |
|||
If the administrator preconfigured the driver on the print server, users connecting to the printer getting automatically the settings applied as default. Preconfigured settings are applied automatically to all driver platforms for the printer, if drivers for multiple architectures are installed on the server. For details, see [[#32-bit_and_64-bit_Drivers|32-bit and 64-bit Drivers]]. |
|||
There are three ways to workaround: |
|||
To preconfigure a printer: |
|||
* Connect to the print server. See [[#Connecting_to_the_Print_Server_Using_the_Print_Management_Console|Connecting to the Print Server Using the Print Management Console]]. |
|||
* Navigate to the <code>Print Servers</code> entry, double-click your print server, and select the <code>Printers</code> entry. |
|||
* Right-click to the printer and select <code>Properties</code>. |
|||
* Depending on the driver, a tab, such as <code>Device Settings</code>, is provided that enables you to set general settings, such as installed paper trays. |
|||
* To preconfigure further settings, navigate to the <code>Advanced</code> tab and click <code>Printing Defaults</code>. |
|||
* Update all settings you want to preconfigure. For example, paper sizes and the default paper source. |
|||
* Save the advanced settings and the printer properties by clicking <code>OK</code>. |
|||
* Set the following (undocumented) parameter in your <tt>[global]</tt> section of your smb.conf, to make spoolss announce itself as x64 architecture: |
|||
spoolss: architecture = Windows x64 |
|||
* Assign the driver with <tt>rpcclient</tt>. |
|||
* Additionally upload a x86 version of the driver with exactly the same name. |
|||
== Point'n' Print doesn't deliver the drivers on all architectures == |
|||
---- |
|||
Make sure that you have uploaded exactly the same driver for that printer for all architectures. E. g. „HP Universal Printing PS“ for x86 and „HP Universal Printing PS (v5.5.0)“ for x64 wouldn't match, even if they are shipped in the same driver package! |
|||
[[Category:Active Directory]] |
|||
[[Category:Domain Members]] |
|||
[[Category:NT4 Domains]] |
|||
[[Category:Printing]] |
|||
[[Category:Standalone Server]] |
|||
[[Category:Group Policy Management]] |
|||
Latest revision as of 09:53, 10 May 2024
Introduction
If you are running a Samba print server for Windows clients, you can upload drivers and preconfigure printers. If a user connects to a printer on the Samba server, Windows automatically downloads the driver and installs it locally. The user does not require local administrator permissions for the installation. Additionally, Windows applies preconfigured driver settings, such as paper sizes and the number of trays.
| Before you can set up automatic printer driver download, configure Samba as a print server and share a printer. For details, see Setting up Samba as a Print Server. |
Supported Printer Drivers
General Information
Many driver are provided in a way that enables you to upload them to your Samba print server:
- If the driver is provided in a compressed format, unpack the archive.
- Some drivers are require to start a setup application that installs the driver locally on a Windows host. In certain cases, the installer extracts the individual files into the operating system's temporary folder during the setup. To use the driver files for uploading them to a Samba print Server, start the installer, copy the files from the temporary folder to a new location, and cancel the installation.
Ask your printer vendor, if the driver supports uploading to a print server for automatic download by Windows operating systems.
Supported Windows Printer Drivers
Samba only supports the printer driver model version 3 that is supported in Windows 2000 to 10 and Windows Server 2000 to 2016.
To use package-aware drivers:
- Run Samba 4.7 and later
- Enable the
spoolssdservice. For details, see Enabling the spoolssd Service.
The driver model version 4, introduced in Windows 8 and Windows Server 2012, is not supported in Samba. Use version 3 drivers instead.
32-bit and 64-bit Drivers
Printer drivers for the 64-bit Windows architecture, you can only upload from a Windows 64-bit operating system. 32-bit drivers you can upload from both 32-bit and 64-bit Windows operating systems.
To provide driver for both architectures, you must upload 32-bit and 64-bit drivers that uses exactly the same name for both architectures. For example, if you are uploading the 32-bit HP Universal Printing PS driver and the 64-bit HP Universal Printing PS (v5.5.0) driver for Windows, the driver names are different and cannot be used and preconfigured for the same printer.
Uploading Only 64-bit Drivers to a Samba Print Server
Using the default setting, Samba reports itself as Windows NT x86 architecture. Thus, 64-bit drivers stored on this print server can only be assigned to a printer if additionally a 32-bit driver with exactly the same name is uploaded. Otherwise, Windows does not display the driver in the list displayed in the printer's properties when assigning the driver.
To provide only 64-bit driver on the Samba print server:
- Add the following setting to the
[global]section in yoursmb.conffile:
spoolss: architecture = Windows x64
- Reload Samba:
# smbcontrol all reload-config
Granting the SePrintOperatorPrivilege Privilege
Only users and groups having the SePrintOperatorPrivilege privilege granted can upload and preconfigure printer drivers. You can grant this privilege to any user or group.
For example, to grant the privilege to the Domain Admins group, enter:
# net rpc rights grant "SAMDOM\Domain Admins" SePrintOperatorPrivilege -U "SAMDOM\administrator"
Enter SAMDOM\administrator's password:
Successfully granted rights.
| It is recommended to grant the privilege to a group instead of individual accounts. This enables you to add and revoke the privilege by updating the group membership. |
If you get the following error:
 Could not connect to server 127.0.0.1
 The username or password was not correct.
 Connection failed: NT_STATUS_LOGON_FAILURE
- Create in /etc/samba the file "user.map"
- Edit /etc/samba/user.map and add line:
!root = SAMDOM\administrator SAMDOM\Administrator
- Add in smb.conf to the [Global] section:
username map = /etc/samba/user.map
- Reload Samba:
# smbcontrol all reload-config
If you get the following error:
 Could not connect to server 127.0.0.1
 Connection failed: NT_STATUS_INVALID_TOKEN
- Add in smb.conf to the [Global] section:
min domain uid = 0
- Reload Samba:
# smbcontrol all reload-config
To list all users and groups having the SePrintOperatorPrivilege privilege granted, enter:
# net rpc rights list privileges SePrintOperatorPrivilege -U "SAMDOM\administrator"
SePrintOperatorPrivilege:
  BUILTIN\Administrators
  SAMDOM\Domain Admins
Windows downloads printer drivers from the print$ share of a print server. This share name is hard-coded in Windows and cannot be changed.
To share the /srv/samba/printer_drivers/ folder using the print$ share name:
- Add the following section to your
smb.conffile:
[print$]
       path = /srv/samba/printer_drivers/
       read only = no
- Reload Samba:
# smbcontrol all reload-config
- Create the directory:
# mkdir -p /srv/samba/printer_drivers/
- Set the permissions on the share. Users or groups having the
SePrintOperatorPrivilegeprivilege granted must be able to to write to the share. For example, to set write access for theDomain Adminsgroup and read permissions for other users to be able to download the drivers:
- Using POSIX access control lists (ACL):
# chgrp -R "SAMDOM\Domain Admins" /srv/samba/printer_drivers/
# chmod -R 2775 /srv/samba/printer_drivers/

When setting up a Samba print server on an Active Directory (AD) domain controller (DC), you cannot use POSIX access control lists (ACL). Use the Windows utilities to set extended ACLs. For details, see Enable Extended ACL Support in the smb.conf File.
- Using Windows ACLs:
- Set the following permissions using the Windows utilities:
Principal Access Apply to Creator Owner Full control Subfolders and files only Authenticated Users Read & execute, List folder contents, Read This folder, subfolders and files Domain Admins Full control This folder, subfolders and files
- For details, see Setting Share Permissions and ACLs.
Samba automatically creates the architecture subdirectories on the print$ share when uploading a driver.
Creating a GPO for Trusting the Print Server
| In July 2016, Microsoft released an update to fix security issues in the Windows print spooler. This update changes the behaviour and limited support for non-package-aware printer drivers. In October 2016, Microsoft published an update to mitigate these problems in an Active Directory (AD). For further details, see MS16-087. This section describes the procedure to work around the problems in an AD. |
To avoid installing malicious drivers from untrusted sources, Windows asks you if you trust the print server when you preconfigure a printer or when a user installs a printer. Create a group policy object (GPO) to trust the Samba print server and work around the known issues introduced by the Windows print spooler security update:
- Log in to a computer using an account that is allowed you to edit group policies, such as the AD domain
Administratoraccount.
- Open the
Group Policy Management Console. If you are not having the Remote Server Administration Tools (RSAT) installed on this computer, see Installing RSAT.
- Right-click to your AD domain and select
Create a GPO in this domain, and Link it here.

- Enter a name for the GPO, such as
Legacy Printer Driver Policy. The new GPO is shown below the domain entry.
- Right-click to the newly-created GPO and select
Editto open theGroup Policy Management Editor.
- Navigate to the
Computer Configuration→Policies→Administrative Templates→Printersentry.

- Double-click to the
Point and Print Restrictionpolicy to edit the policy:
- Enable the policy and set the following options:
- Enable
Users can only point and print to these serversand enter the fully-qualified domain name (FQDN) to the field. - Select
Do not show warning or elevation promptin both theWhen installing drivers for a new connectionandWhen updating drivers for an existing connectionlist.
- Enable

- Click
OK.
- Click
- Double-click to the
Package Point and Print - Approved serverspolicy to edit the policy:
- Enable the policy and click the
Showbutton.
- Enter the print server's FQDN. For example:
- Enable the policy and click the

- Close both the content and policy properties by clicking
OK.
- Close both the content and policy properties by clicking
- Close the
Group Policy Management Editor. The GPOs are automatically saved on theSysvolshare on the domain controller (DC).
- Close the
Group Policy Management Console.
Wait until the Windows domain members applied the group policy automatically. To apply the policy manually:
- Reboot the domain member.
- Run the following command using an account having local administrator permissions:
> gpupdate /force /target:computer
Creating a GPO for RPC connection updates for print in Windows 11
| Windows 11, version 22H2 (October 2022) introduces changes to print components that modify how Windows machines communicate with each other during printing or print related operations. For example, the changes come into effect when you print to a printer shared out by a print server or another computer on the network. These changes were made to further improve the overall security of printing in Windows. The default configuration of the RPC connection settings enforces newer and more secure communication methods. Home users and enterprise administrators can also customize the settings for their environment. |
- Log in to a computer using an account that is allowed you to edit group policies, such as the AD domain
Administratoraccount.
- Open the
Group Policy Management Console. If you are not having the Remote Server Administration Tools (RSAT) installed on this computer, see Installing RSAT.
- Navigate to the
Computer Configuration→Policies→Administrative Templates→Configure RPC Connection settingsentry.

- Double-click to the
Configure RPC Connection settingspolicy to edit the policy:
- Enable the policy and set the following options:
- Enable
RPC over named pipes.
- Enable
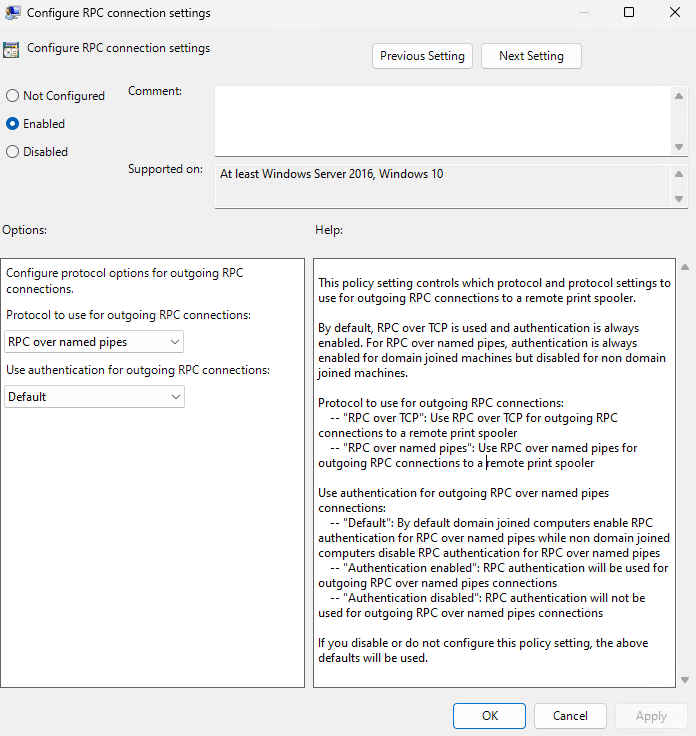
- Close both the content and policy properties by clicking
OK.
- Close both the content and policy properties by clicking

- Close the
Group Policy Management Editor. The GPOs are automatically saved on theSysvolshare on the domain controller (DC).
- Close the
Group Policy Management Console.
Wait until the Windows domain members applied the group policy automatically. To apply the policy manually:
- Reboot the domain member.
- Run the following command using an account having local administrator permissions:
> gpupdate /force /target:computer
Connecting to the Print Server Using the Print Management Console
To connect to the Samba print server:
- Log on to a Windows host using an account that has the
SeDiskOperatorPrivilegeprivilege granted and write permissions on theprint$share.
- Click
Start, enterPrint Management, and start the application.
- Right-click to the
Print Serversentry and selectAdd/Remove Servers.
- Enter the name of the Samba print server in the
Add serversfield, and clickAdd to List.

- Click
OK.
When you are connected to the print server, you can perform certain tasks, such as uploading drivers and preconfiguring printers.
Uploading a Printer Driver to a Samba Print Server
To upload a printer driver:
- Connect to the print server. See Connecting to the Print Server Using the Print Management Console
- Navigate to the
Print Serversentry, double-click your print server, and right-click to theDriversentry.
- Select
Add Driver.
- In upcoming wizard, select the architecture you want to upload a driver for, and select
Next.
- Click
Have Diskand navigate to the folder containing the printer driver for the selected architecture.
- Select the driver to upload from the list.

When you upload 32-bit and 64-bit drivers for the same printer, both drivers must have exactly the same driver name. For details, see 32-bit and 64-bit Drivers.
- Click
Finishto start uploading the driver to theprint$share.
- After uploading, the driver is shown in the
Driversmenu.

Optionally, upload drivers for additional architectures.
Assigning a Driver to a Printer
Using the Print Management Console
To assign a driver to a printer using the Windows Print Management console:
- Connect to the print server. See Connecting to the Print Server Using the Print Management Console
- Navigate to the
Print Serversentry, double-click your print server, and select thePrintersentry.
- Right-click to the printer and select
Properties.

- When no driver is associated with the printer, the following warning is shown:

- Click
No. The driver is selected in a later step from the list of uploaded drivers.
- Navigate to the
Advancedtab and select the driver from the list. For example:

- If you uploaded only a 64-bit driver and the driver is not displayed in the list, see Uploading Only 64-bit Drivers to a Samba Print Server.
- Click
OKto set the driver for the printer.
- If a warning is displayed, cancel the operation and set up a group policy to trust drivers provided by this print server. For details, see Creating a GPO for Trusting the Print Server.

- After the driver is assigned to the printer, Windows automatically renames the printer to the name of the printer driver. It is recommended, to manually reset the name to the printer name set in the
smb.conffile:
- Right-click to the printer and select
Rename. - Reset the printer name to the name set in the
smb.conffile, and pressEnter. - If the printer list is not refreshed automatically, press the
[F5]key.
- Right-click to the printer and select
Using the Samba rpcclient Utility
To assign a driver to a printer locally on a Samba print server using the rpcclient utility:
- List all drivers available on the
print$share:
# rpcclient localhost -U "SAMDOM\administrator" -c "enumdrivers"
- Assign the driver to the printer. For example, to assign the
HP Universal Printing PSdriver to theDemoPrinterprinter, enter:
# rpcclient localhost -U "SAMDOM\administrator" -c 'setdriver "DemoPrinter" "HP Universal Printing PS"'
- To verify the result:
# rpcclient localhost -U "SAMDOM\administrator" -c "enumprinters"
Preconfiguring a Printer
If the administrator preconfigured the driver on the print server, users connecting to the printer getting automatically the settings applied as default. Preconfigured settings are applied automatically to all driver platforms for the printer, if drivers for multiple architectures are installed on the server. For details, see 32-bit and 64-bit Drivers.
To preconfigure a printer:
- Connect to the print server. See Connecting to the Print Server Using the Print Management Console.
- Navigate to the
Print Serversentry, double-click your print server, and select thePrintersentry.
- Right-click to the printer and select
Properties.
- Depending on the driver, a tab, such as
Device Settings, is provided that enables you to set general settings, such as installed paper trays.
- To preconfigure further settings, navigate to the
Advancedtab and clickPrinting Defaults.
- Update all settings you want to preconfigure. For example, paper sizes and the default paper source.
- Save the advanced settings and the printer properties by clicking
OK.