Windows DNS Configuration
From SambaWiki
(Redirected from DNS Configuration Windows)
Introduction
In an Active Directory (AD), DNS is an necessary component to locate domain controllers (DC) and services, such as Kerberos and LDAP. This documentation describes how to set the DNS server setting manually on a Windows operating system. If your configure client IP and DNS settings using a DHCP service, please consult your DHCP server's documentation for how to deploy the setting.
Configuring the DNS Server Settings
You can run the following steps on any Windows operating system that is actively maintained by Microsoft:
- Click
Start, enterNetwork and Sharing Centerinto the search field, and start the application.
- If you are running Windows 8.1, enter the string on the Metro screen to search.


- Click
Change adapter settings.
- Right-click to the network adapter connected the network running the Active Directory (AD) and select
Properties.
- If your DNS server runs the IPv4 protocol: select
Internet Protocol Version 4 (TCP/IPv4)
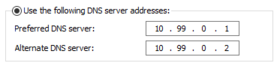
- Select
Use the following DNS server addresses - Enter the IP address of the DNS server in the
Preferred DNS serverfield. Optionally, specify a second DNS server in theAlternate DNS serverfield for failover reasons.
- Note that all DNS servers must be able to resolve the AD DNS zones.
- Click
OK
- Select
- If your DNS server runs the IPv6 protocol: select
Internet Protocol Version 6 (TCP/IPv6)
- Select
Use the following DNS server addresses - Enter the IP address of a DNS server in the
Preferred DNS serverfield. Optionally, specify a second DNS server in theAlternate DNS serverfield.
- Note that all DNS servers must be able to resolve the AD DNS zones.
- Click
OK.
- Select
- If your DNS server runs the IPv4 protocol: select

- Click
OKto save the changes.
Testing DNS Resolution
To verify that your DNS configuration is working, see Testing the DNS Name Resolution.