Implementing System Policies with Samba
Introduction
When you implement any network system, especially one with Microsoft Windows Workstations, it is very important to be able to control certain aspects of each connected Workstation and it's users. Which settings that can be changed, what programs that can be run, as well as how each workstation is presented to the user; all of these are important to maintain control of your network. This type of control is not only important from a security standpoint, but is almost equally important from a usability standpoint.
In order to provide this functionality for Windows based networks, Microsoft added the ability to adjust certain settings through System Policies. These policies allow you to enforce certain restrictions for network workstations by mandating certain Windows Registry settings that networked computers, users and groups must use. Let me re-iterate that - Policies are simply mandated registry settings for each machine and user on your network.
Microsoft Windows Policies were first implemented with Windows 95 and have changed little since their inception. These Policies were created with a tool called the System Policy Editor and are downloaded from a Domain Controller every time a user logged into a networked workstation. Since then, Microsoft incorporated Policies into it's Active Directory Service and renamed them to Group Policy Objects. When this happened the biggest change between Group Policy Objects and System Policies is that GPOs are no longer applied to the user's profile, but work alongside them. This means that GPOs do not "tatoo" the user's profile with registry settings. In other words, if you remove a policy with GPOs, the policy is no longer in effect, with System Policies, you must "undo" the policy to totally remove them from existing user's policies. However, with proper implementation of policies, the effects of "tatooing" a user's profile becomes minimal.
Currently Samba, the Free Software SMB Server, does not implement Active Directory functionality when using it as a Primary Domain Controller. If you deploy any Samba PDCs you will want to master System Policies using the SPE. So this article will cover the basics of Microsoft's older System Policy Editor, how to obtain it, use it and implement it's policies.
Obtaining Microsoft's System Policy Editor
In order to use System Policy Editor, you must first obtain it. Unfortunately, it is a proprietary tool so you must get it directly from the software maker, specifically Microsoft. The SPE is available with a few of their products; Windows NT Server, Windows 2000 Server, as well as their Office Resource Kits. However, the easiest place to obtain a the SPE is within Windows 2000 Service Pack 4. To install from Windows 2000 SP 4 follow these directions.
Getting Microsoft's SPE from Windows 2000 SP4
- Go to Microsoft's Windows 2000 home page here - [1]
- Download the Service Pack 4 Network Installation file.
- Once Downloaded, extract the files with the command "W2kSP4_EN.EXE /x"
- Launch the file "adminpack.msi" to install the server tools
- Run "poledit.exe"
Getting Microsoft's SPE from Windows NT4 SP6a
- Go to Microsoft's NT Server home page here - [2]
- Go to the Downloads Section and Download Service Pack 6a for x86 computers
- Extract the download with the command "NT4SP6ai.exe /x"
- Find the file "poledit.exe" and copy it to the C:\Windows directory (or equivalent)
- Find files with the extension "*.adm" and copy them to the C:\Windows\inf directory (or equivalent)
- Run "poledit.exe"
NOTE: The version of the System Policy Editor included with NT4SP6a does not support Unicode, if you want to use any of the newer templates released by Microsoft (and others) you must either use the newer System Policy Editor from Windows 2000, or you can simply open up those templates with a text editor and re-save them without Unicode support.
It is very important that you install the System Policy Editor (SPE) on a machine based on the same Operating System as the machines you want to control. If you have Windows NT based Workstations, such as NT4, 2000 or XP, then run the SPE on a similar machine. If you mostly use Windows 9x machines, then install the SPE on a similar machine and use the "windows.adm" template instead of the "winnt.adm" template. Policies created on Windows 9x machines will not work with Windows NT based machines (and vice versa). The rest of this chapter is assuming that you are going to create and use Windows NT based policies.
Also, if you are going to adjust policies for specific groups, users and computers (instead of simply the Default Computer and Default User containers), you must run the policy editor on a machine connected to your Windows Domain.
Obtaining SPE Templates
Once you get the System Policy Editor, you will only have basic templates installed. You can get additional templates from Microsoft's website, or you can create your own custom templates that you can use (covered in another wiki). I have created a few custom templates that you can use on my website [3] - if anyone knows a good way to put them on this wiki let me know and I will do it.
Also of interest is an email I received from Eric Hall, which had lots of info on Microsoft's Templates: "....newer versions of the admin template files are also available, but are harder to get. They can be found on the Win2k "server" installs(but not in the service pack), Win2003 server, and a few of them are included in XP too of course (note that neither XP nor Server 2003 include the poledit.exe utility, but they do include the templates). Among the newer files are improved versions of the common.adm and winnt.adm templates, as well as templates for Windows Media Player and Windows Update. These templates are only readable by the Win2k version of poledit.exe, and are unreadable in the v4 poledit, since they use the Unicode 16-bit charset encoding. Admins should also be encouraged to use these newer templates once they get a recent poledit. The complete list of most recent templates (from Server 2003) is:
 03/25/2003  08:00 AM            30,358 common.adm
 03/25/2003  08:00 AM            40,282 conf.adm
 03/25/2003  08:00 AM             6,823 inetcorp.adm
 03/24/2005  06:05 PM         1,719,240 inetres.adm
 03/25/2003  08:00 AM            18,516 inetset.adm
 03/24/2005  06:25 PM         1,764,476 system.adm
 03/25/2003  08:00 AM            17,810 windows.adm
 03/25/2003  08:00 AM            25,556 winnt.adm
 03/24/2005  06:26 PM            68,050 wmplayer.adm
 05/26/2005  04:16 AM            43,244 wuau.adm
I've diffed those against other sources and they are identical to the Win2k server versions, excecpt for inetset.adm which has some additional IEAK options.
Not all of those files are usable in poledit (some of them are "GP only") but the latest version of poledit recognizes this and says as much. According to MS, these can also be made to work inside poledit (see this site [4]) but I haven't been able to get that working."
More information on managing desktops without AD can be found further into the resource kit at this page [5]. The instructions are incomplete, though, regarding the use of the newer templates in poledit.exe. Specifically, you will need to delete everything between the #if version <=2 and #endif. You will also need to delete the subsequent line (#if version >=3) and the trailing #endif, just before the [strings] section. Be warned: many of the new templates are quite large and can take some time to process (read several minutes after clicking "OK").
Some Useful template files
Here are some useful template files
- pointandprint.adm implements all the PointAndPrint controls described in [6]
Using the System Policy Editor
Basically what the System Policy Editor is used for is to create a single file that contains all of the policies for your network. This file is downloaded by your client computers every time a user logs into the server. This section will show you how to properly create the policy file and explain what to avoid when implementing System Policies.
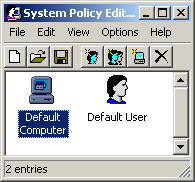
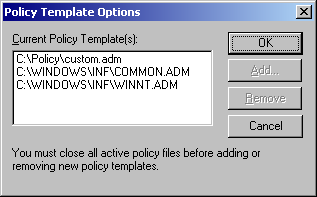
When you first launch the System Policy Editor it will appear similar to the above picture. If you received an error upon starting, more than likely the SPE cannot find the default template files common.adm and winnt.adm. These template files are simple text files that that contain registry settings that allows you to control different aspects of computers or users. You can add as many template files as you need by going to Options -> Templates (see image below).
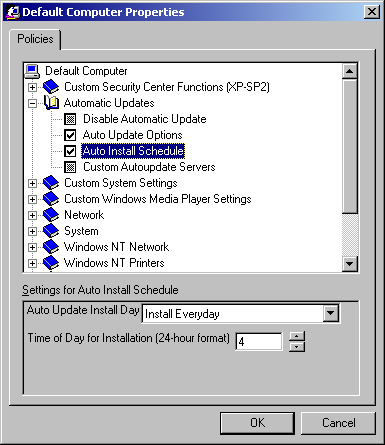
Once you obtain all necessary templates, you can start creating your policies. By default the SPE will have a Default Computer object and a Default User object. I will talk more on these later, but first let's start adjusting policies to allow you to get the hang of it. We will start by simply opening the Default Computer object, it should look something like the image below (although the illustration does show a custom policy).
The little books you see on the screen are simply there for categorizing all of the policies into separate sections. When clicking on the plus sign next to the books, the subcategory will expand revealing the policies (or more subcategories). The actual policies are shown as little greyed out boxes. These boxes have 3 different states, greyed out, checked and cleared.
- The grayed out state simply means that the Policy will be overlooked. For example, if the computer does not have the registry setting enabled, it still will not be enabled, and vice-versa.
- The checked state means that the policy will be in effect on the computer.
- While the cleared state means that the registry setting will be cleared (if in fact it was enabled in the first place).
It might sound a little odd that there are 3 states for the policies, but once you throw in different groups you will quickly see why there are 3 states. A brief example of using a cleared state is to enable the policy of "Disable registry editing tools" to the Default User Container, but than clearing that policy for the Domain Administrators container, thus allowing anyone in the Domain Admin group access to registry editing tools, while other users that are not a Domain Admin will not be able to launch any registry editor.
Adding Computers, Groups & Users
When first creating a new policy file, you are able to adjust the "Default Computer" and the "Default User" containers. Any policy that you implement in these containers will be applied to every computer and every user on your network. For finer control of your network resources you are able to add additional containers to the policy file, such as specific computers, groups or users.
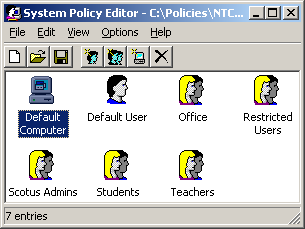
In my experience you will rarely want to add additional computers or users to your policy file, as there is usually a better way to implement policies through Groups. Illustration shows you an example of one of the networks that I implemented for a school. As you can see, I went with adding various groups to control the entire network population. This method seems to work very well. Not only is it easier to maintain and easier when adding new users, but it also reduces the size of the policy file. Keeping the policy file small should be a somewhat high priority because this file will be downloaded by the client every time a user logs into the computer. When you start adding specific computers or users to your policy file, the policy file will grow substantially resulting in every user downloading policies that they do not even use.
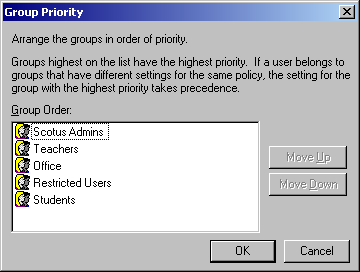
When implementing a group base policy template it is best to add groups that are a least common denominator, in that a user is only a member of 1 group within your policy file. This is sometimes easier said than done, but with proper preparation and research it can be done. However, if you inherit a network that is sub-optimal, there is a tool within the System Policy Editor called Group Priority that will help you maintain your sanity.
In these instances, what usually happens is that a policy is applied to one group and is not cleared in another group. For example, say you have 2 groups, one is Teachers and the other is Students. For some reason a share was implemented that only the group Students can access. So an unknowing administrator adds all the teachers to the student group. If the policy files are not setup correctly anyone in the Teachers group could inherit all of the policies of the student group.
To combat the problem of having the wrong policies applied to your users it is very important to "clear" out the unwanted policies in the user's default group. For instance if you want the Student groups to not be able to map a network drive, but allow the Teachers group to, make sure you implement that policy in the Student container and clear that policy in the Teacher container. Furthermore you must also ensure that the Teacher container has a higher group priority than the Student container, otherwise what you just did will not make a difference since the Student container could overpower the Teacher container.
Once you create your Policy File, you must save it as "NTConfig.POL", then copy it to the "NETLOGON" share of all of your Domain Controllers. To create a NETLOGON Share on a Samba Domain Controller, simply create a directory on your server, such as "/srv/samba/netlogon", change the permissions so that everyone has read-only rights (chmod o-wx or chmod o+r) then add the following to your shares section of your smb.conf file.
[netlogon]
comment = Network Logon Service
path = /srv/samba/netlogon
guest ok = Yes
browseable = No
# If you have problems, try adding the following line
# acl check permissions = no
Now just add the NTConfig.POL file to the share, and possibly a logon script. Also ensure that everyone has read access to the files you put in the share.
Mgpeter 16:01, 6 June 2006 (CDT)
